Tuesday, September 22, 2009

Make. Greeting Card Organizer

 may2208 006 How great is this project?  This card organizer has pockets for each month and has a perpetual calendar so you can use it year after year.  may2208 009 I used this tutorial with some modifications.  I relied on designer paper for decorating the organizer and in this particular one I kept the pages white to save on cost (I eventually sold this at a craft show). 

may0708 006 This is the inside of one that I made using all double sided paper.  I really love how it turned out. 

Instead of using a bind it all, I punched holes through all the pages.  I added eyelets on the front and back pages.  I used some hemp twine to tie it all together. 

may0708 004

Labels: , , , , , ,

Related Posts Widget for Blogs by LinkWithin
Bookmark and Share

Monday, August 24, 2009

Learn. How to Make a Pinata From a Balloon.

aug20-22 014

This is my August Craft Challenge entry. I sent out all the purple tissue paper I had so I used yellow for mine. You also can't really see the details in this picture so I thought I'd give a step by step.

My former resident of Mexico and Spanish teacher self loves pinatas. I've made them out of jarras (clay pots), cardboard, and balloons. Using a balloon is the best choice for a quick and easy pinata.

Supplies:

  • balloon
  • newspaper
  • papier mache paste (recipe below)
  • tissue paper
  • household glue

IMG_2485

Papier Mache Paste Recipe

Mix 1/2 cup of flour with 2 cups cold water. Bring 2 more cups of water to a boil. Add your flour mixture. Stir until boiling. Remove from heat, pour into a bowl, and let cool. Some recipes out there add sugar after boiling. I've tried both ways and it doesn't seem to make much of a difference. If I have it nearby, I add it. If not, I don't.

While your paste is cooling, blow up a balloon and tear 2 inch wide strips of newspaper.IMG_2486 As you can see, my daughter did a lot of the work. She was so excited to help and it was a good project for her to work on now that big brother is back in school.

What you do next is the fun and messy part. Spread the paste on one side of the paper strips and start to cover the balloon.

IMG_2487 You'll want to make one solid layer and then let it dry overnight. Do another layer the next day. Another layer the next. Did I mention that making a pinata takes a little bit of planning? You'll want at least 3-4 days of lead time. To be honest, I did two layers in one day. That worked out okay but it wasn't ideal.

When you are making your layers, be sure to leave an opening at one end of the balloon. I chose the tapered end. You'll need this opening for the candy!

When your layers are completed and dry, pop the balloon and pull it out. Now you're ready to decorate!

IMG_2488 For this one, I wanted it to look like a big pom pom or flower. I took the tissue paper squares, pinched them in the middle, dipped them in a bit of Elmer's glue and stuck them to the pinata.

I added pom poms (the white bits) around it, too. In this photo you can also see the card I made to go with the pinata. I made this for Deb's 30th birthday party. The eyelet is on the card and I strung it onto the rope.

I filled it with candy (gum & starburst). I added the gold coins to the inside as well. When the kids broke open the pinata, if they found a gold coin they got to choose a full-size candy bar. I thought it was a nice touch.

I used the craft sticks to hold the rope. I stuck them in the hold and tied the rope to the sticks. They didn't last very long. After one or two people, the sticks broke and we had to replace with a heavier duty dowel.

aug20-22 013 Everyone really enjoyed the pinata and it was a blast to make!

Have you finished your August Craft Challenge yet? You have until Wed. Aug 26th. If you'd like to participate in next month's challenge, you can purchase your packet in my etsy shop.

Labels: , , , , , , ,

Related Posts Widget for Blogs by LinkWithin
Bookmark and Share

Friday, August 07, 2009

Learn. How to Heat Emboss.

One of my very first tutorials on this site was to show how to dry emboss. This past week my best friend, Tiffany, was here to visit. We had an impromptu "class" on how to heat emboss and we filmed it for the site.

Supplies needed:
  • Stamps
  • Versamark ink pad
  • Cardstock
  • Embossing powder
  • Heat gun

Labels: , , , , ,

Related Posts Widget for Blogs by LinkWithin
Bookmark and Share

Thursday, July 30, 2009

CHA Summer Report. Letterpress Starter Kit

As most of you know, I've been at the Craft and Hobby Trade Show this past week checking out all of the new and exciting craft products about to hit the market. Over the next few weeks, I'll be featuring some of my favorites.

The first is the Letterpress Starter Kit from Lifestylecraft.com. This comes from the QuicKutz company and is the best (maybe only?) portable letterpress system I have seen.

They offer a wide range of plates in a few different categories: Everyday, Wedding, Baby, Holiday, and Celebrations.
I love this plate in particular. This one is from the wedding collection but really fits a whole multitude of occasions and is very versatile.

Would you like to see how it works? Amy from QuicKutz gave me a quick demo.


If you watched through the whole video you know that this product will retail for $149.99 including the Epic 6 Tool or will be $69.99 without. The plates will fit in similar machines (Big Kick, Cuttlebug). It won't be available for a couple of months but I spoke with a representative from the company and I should have one to test out for myself soon. I'm sure the Lincoln Handmade Etsy Team will put it through its paces and give you all a fair assessment of the product. I'm pretty sure you'll want to put this one on your Christmas list now.

Labels: , , , , ,

Related Posts Widget for Blogs by LinkWithin
Bookmark and Share

Tuesday, July 28, 2009

Learn. How to Make a Kid T-Shirt Dress from an Undershirt.

Today's guest blogger is Mandy.  Mandy has been a craft challenge participant for a while and we've gotten to know each other through twitter.  Her blog is rather new so I hope you'll go and check it out!  She has a lot of great things on there.   

Hey everyone...this is Mandy from Id Rather Be Crafting and I'm so excited to be filling in for Christy. This post will show you one of two things:

First, I suck at laundry.

Second, (and in the vein of a Craft Challenge) if you use just a bit of craftiness, even a nasty old shirt bound for the trash can be turned into a cute dress or cover up, without using any thread!

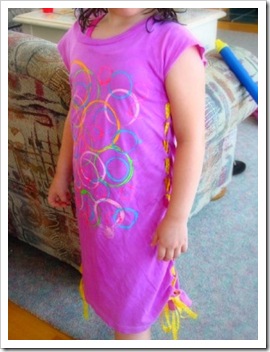
 sara remade tshirt dress


before undershirtThis is the undershirt I started with....

I swear it was washed. Several times. But, as my husband is all man, it has gotten a “little” yellow around the pits. Despite that, it took only a few supplies and some elbow grease to give it a second life in my daughters wardrobe. Want to give it a try?


Take the nastiest shirt out of your husbands pile of dirty clothes drawer of freshly laundered undershirts and get to work. Our first step was dying the shirt. This isn't really necessary, but it does make it look less like an undershirt. Grab a box of dye from the craft store and follow the directions. Easy.

Once it is dry, throw it on your child. You will want to kind of pinch the front and back together around her side to get an idea of how tight or loose you want the dress. Also take note of where her arm pit is to make the arm hole later. I marked mine off with pins, but if you have a particularly wriggly child, I would suggest using a marker, just outside of the line you plan to cut. Then cut that bad boy all the way from the bottom of the shirt to the shoulder. Don't worry about cutting neatly, as most mistakes will be hidden as the t-shirt rolls and comes together.

tshirt cut and dye

Once you have your sides cut, take your scissors and make holes on the side you just cut, going from the bottom of the shirt, and stopping where you marked the arm pit. The holes should be about one inch apart from each other, and one inch in from the cut side. You will probably have to do the front then the back, but just try to make the holes line up. Then do the other side of the shirt! Once you're done, lace up the holes using either a ribbon, shoe lace, or some other scraps in any fashion you choose. If you tighten and scrunch the lacing, it will make the dress shorter – kind of like ruching.


riley remade tshirt dress


For my oldest daughter, this is where the construction ended, but for my 4 year old, it was still too baggy. We ended up cutting the top of the shirt off (where the arm pit marks were) and making it a spaghetti top. I braided a few t-shirt scraps together and just poked a hole where they were placed, threaded the braid through, and made a knot on the back side to keep it in place.


making tshirt The fun for the kids is decorating. Gather a bunch of different sized circles (using tupperware, bottles, cups, lids, etc) and put different colors of fabric paint on plates. We stuck a cereal box in between the layers and then I handed the reins to them. They turned out perfect!

After it dries, you are good to go! Make it unique with a different neck line, or fringe the bottom, or a different painting. It takes a little time, but was a great way to show my girls how to turn trash to treasure.

Labels: , , , , , , , , ,

Related Posts Widget for Blogs by LinkWithin
Bookmark and Share

Monday, July 27, 2009

Learn. How to Weave a Chair Seat With Fabric.

Meet Lisa, our guest blogger for today! I know Lisa from my local knitting group. She's super funny and always has the best stories from her adventures in teaching Kindergarten. Enjoy this post from her!

My name is Lisa. I'm a teacher, knitter, quilter, and all around crafter. During the summer months, I tend to find myself neck deep in ongoing projects and I blog about them here.
A month or so ago I found a chair for sale. It was a beautiful wooden number with a rattan seat. The seat needed reworking (which I had never done) but the chair itself was sturdy and had such beautiful lines, I couldn't pass it up.
I knew I had to repair the seat, but wasn't sure how. After walking through my favorite fabric store ever, The Cosmic Cow, and drooling on a new fabric I was considering eloping with, the idea came to me. I'd incorporate the print into the seat.

  • Here's what you need:
  • 100 feet cotton clothesline cording (must be cotton)
  • 2 yards of fabric (pre-cut jelly rolls purchased from quilting stores will work if you're not interested in taking the time to cut the strips)
  • matching cotton thread
  • sewing machine
  • ironing board & iron
  • chair

After cutting the fabric into 2 1/2 inch strips, iron them as if they were bias tape (folding the cut strip in half the long way and ironing), open the strip, fold each half in half again and iron. (you will have four equal sections after final ironing) This will hide the long side raw edges.
Next, you will wrap each ironed strip around the clothesline cord like a burrito. I found it easiest to position the cording in the center of the strip, folding the right half over first, followed by the left. Make sure to fold the beginning of each strip over to hide the short side raw edges and sew down the center of the wrapped cording using a straight stitch.
For my chair, I used the entire 100 foot strand of cording.


Below are pictures of the 'naked' chair and the different stages of weaving.

Here is the chair sans webbing. It received a good scrubbing then I stained the dowels in case any of them showed through after installing the new seat.


Prior to securing cording to the chair, I found the half-way point on the cording and marked it. I wanted to make sure I had enough for both sides of the chair.


I stapled the cording to the bottom of the dowel using a staple gun.


I wrapped the cording around the chair tightly. You can see the rope I used to mark the 1/2 way point. I decided that if I ran out of cording before finishing wrapping in one direction, I would space it out evenly. Fortunately, that didn't happen.


I stapled the cording to the chair and cut. Using the same wrapping method, wrap the chair in the opposite direction but weave as you go. I made sure to weave the upper and lower part of the seat. Pull tightly as you go. I figured the fibers would loosen the more the chair was used.

This part is not for weak fingers. My fingers began to get sore trying to squeeze as many weaves as I could into the seat. I would up getting a knitting needle and using it to help me pull the cording. The end of the needle (not the point) was great for hooking the cord when the space got too small for my fingers.

When I couldn't weave another row, I spaced the cording out evenly in both directions.


This is my favorite craft project of the summer. It was lots of fun to do. If you have any questions, please feel free to contact me via my blog and I'll do my best to answer them. Have fun!

Labels: , , , , , , , , ,

Related Posts Widget for Blogs by LinkWithin
Bookmark and Share

Thursday, July 23, 2009

Learn. How to Make a Polymer Clay Strawberry Charm.

Please welcome Jessica--our guest blogger for today! I "met" Jessica on twitter and when I put my call out for guest bloggers, she quickly replied! I have yet to try my hand at polymer clay so I have been looking forward to this tutorial. Check out her blog and etsy shop.

Well, hello there, readers! It's a pleasure to see you on this fiiiine summer day. I'm really excited to be a Guest Blogger here for Christy and I hope you're excited, too!

clip_image002

First off, allow me to introduce myself. I'm Jessica from Frosted Treats. I specialize in all sorts of crafts -- from scrapping, to sewing, to sculpting, and beyond. I'm from the great state of New Jersey and I blog about and (attempt to) sell my creations to support my crafting habit.

While I have been a sorta-crafter most of my life, my jump to becoming a craft-blogger started about a year ago when I got hooked on sculpting with Polymer Clay (PC). I spotted some ADORABLE mini cupcake charm necklaces and I had to know how to make them for myself! I got to work searching for tips, tricks, techniques and tutorials on how to make all sorts of goodies and here I am today.

Sculpting with PC requires patience, persistence, and a steady hand. Today I'll be walking you through a project that's a great way to get started on your PC hobby (addiction). Let's take a look at a cute lil strawberry charm.

Let's gather our supplies. Polymer clay comes in many brands, all of which have their ups and downs. I use Sculpey III as it's inexpensive and it comes in a multitude of colors.

clip_image004I have Red Hot Red (583) and Leaf Green (322) for this project. PC normally costs about $1-3 per brick, depending on the brand. Sculpey is the least expensive. I also gathered a thick needle, an eye pin, a tooth pick, and a paint brush with a rounded bottom. Make sure your work surface is clean and flat. I use a plate of glass salvaged from an old cabinet for my work surface. Also, make sure your hands are CLEAN. I keep baby wipes on hand for a quick clean between colors. Clean your hands and tools whenever you switch from one color to another.

clip_image006Also, I invested in some Translucent Liquid Sculpey (TLS).

This will be the most expensive part of your PC habit. It runs about $7-8 and can be found in most stores that carry PC. It's an invaluable tool, trust me. This stuff is what keeps your pieces together so that you won't have to smush them all together and have your colors mix. A dab'll do ya, so this bottle lasts.

Now that we have our tools, let's get busy!

clip_image008

Shape your red piece into a sort of bullet shape. Blunt, rounded bottom with a wider top that's flat-ish. A strawberry shape.

clip_image010

Take your needle and make little indents to be your "seed" designs. I usually put my marks in a sort-of "checker board" pattern and space them out around the whole berry. Set your berry down and grab the green.

clip_image012

Now take your green and cut it into 4 equal-ish portions. The leaves don't need to be completely uniform.

clip_image014

Take one green portion and shape it into a little pellet.

clip_image016

Flatten your piece between your fingers.

clip_image018

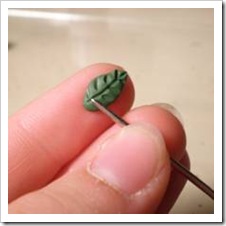
Pinch the ends a bit to give it a nice leafy-shape.
clip_image020

Grab your needle again and scour in some leaf marks. Make one long stroke down the middle and then some marks fanning out. Go through this process again for all of your leaves. Set them aside for now.

clip_image022

Take your paint brush bottom and poke an indent into the top of your berry. Round it out and make it look nice and natural. Your leaves will be sprouting out from this indent.

clip_image024

Using your toothpick, drip a bit of your TLS into this indent.

clip_image026

Dab some TLS on the backs of your leaves, also.

clip_image028

Start placing your leaves on your berry, but be careful not to smush them down too much and distort your markings. The TLS will act as glue once the clay is baked.

clip_image030

Here's my berry! Now to turn it into something you could hang from a necklace or bracelet.

clip_image032

Cut your eye pin down so that it's small enough to fit into your berry without poking through the sides.

clip_image034

I usually bend the end of my eye pin at a 45* angle so that it won't pull out of the berry while it's in use.

clip_image036

Stick your eye pin into the top of your berry and push it all the way down.

clip_image038

Another way I keep my pins from pulling out is to dab a little TLS around where the pin meets the berry. This will turn clear when it's baked and will again act as glue.

clip_image040

And there you have it! Take a look at the packaging of the PC to see how long to bake your piece for. Normally its 275* for 15mins/per 1/4 inch of thickness. Be sure not to over bake your piece, it will burn and discolor!

I hope you've enjoyed this tutorial! I hope this little project will help you dive into the fun of sculpting with Polymer Clay! Please post photos of your creations, I'd love to see them!

Labels: , , , , ,

Related Posts Widget for Blogs by LinkWithin
Bookmark and Share

Tuesday, July 14, 2009

Learn. How to Make Shrinky Dink Logo Charms

I shamelessly stole this idea from Crafterella. She made some to use as tags on her etsy shop items and I loved them! I asked her how to make them and if I could share the tutorial with all of you.

I decided to make these charms to put on some friendship bracelets I'm planning on handing out at BlogHer. Will you be there? Do you want a bracelet? I'm hoping to have about 100 to give away. We'll see how long my hands hold up.

IMG_2208

Supplies:IMG_2201

  • Shrinky dink plastic
  • inkjet printer
  • paper punches

The first thing I did was put my logo in a word processing document and made it the size I wanted (just over 1 1/2"). I repeated the design as many times as I could over the page.

IMG_2202You'll also want your picture to be reversed. I did this by going into the tools section and choosing "rotate". One of the choices is flip horizontally. That's what you want to do.

Before you print, change the properties on your printer. You want to use the "draft" option. It uses less ink and will prevent smudging.

IMG_2204 Be sure to print on the "fuzzy" side of the plastic.

Next you'll want to punch out your circles. I used a 1 3/4" circle punch. Then I used a 1/16th" punch for the small hole on top.

Follow the instructions on the shrinky dink package for baking. Mine went into a 325 degree oven for about 90 seconds.

IMG_2207

Here you can see a before and after. They shrink up rather nicely and ended up being about the size of a thumbnail.

I really love the way they turned out and I can't wait to pass out the bracelets at BlogHer!

Hope to see you there!

Labels: , , , , , , , , , , ,

Related Posts Widget for Blogs by LinkWithin
Bookmark and Share

Wednesday, July 08, 2009

Learn. How To Use Stitch on Plastic Canvas.

This past week I needed to make my husband a keychain.  You see, it was his birthday and the last present he bought me was this keychain from NASA.  It is now a bit of a joke in the family.  Some friends suggested I make him one for his birthday. 

IMG_2189 His keychain was solar powered.  I tried to mimic that by using glow in the dark yarn.  It works surprisingly well.  I wouldn't want to use this yarn on a very big project though.  It smells funny. 

I stitched this using plastic canvas.  I had a sheet in my stash.  Mine was about 10" X 12" and cost less than a dollar.  I cut out two identical pieces because I wanted the keychain to look nice on both sides.  IMG_2190 We may live in Husker country now but once a Sooner, always a Sooner. 

I thought I'd work up a little tutorial on how to work with plastic canvas.  It is really easy to do, inexpensive, and something the kids can do as well!

IMG_2191


The only supplies you need are:

  • plastic canvas
  • tapestry needle
  • yarn

Cut your plastic canvas to the size you want for your project. 


IMG_2192

When you do your own project, you'll want to start in the far left corner.  I started in a spot where it would be easier to show on the tutorial. 

Leave a tail of yarn as your thread the yarn up through one of the holes. 

As you work your stitches, you can place your tail along the back so it gets caught in the stitches.


IMG_2193

Work diagonally across the row. 

This stitch is called the continental stitch.  It is the easiest and most common stitch used on plastic canvas.

On the bookmark, I did the letters using cross stitch.  Same principle, you just cross back over the stitch you made to make an "x".


IMG_2194Continue working across your rows until finished.  Now you're ready to work the whipstitch. 

To work the whipstitch, work up through an edge stitch.  Wrap your yarn around the edge and come back up through the same hole. 

Wrap your yarn around the edge and then come up through the next hole.  Continue until finished.

Labels: , , , , ,

Related Posts Widget for Blogs by LinkWithin
Bookmark and Share