Tuesday, September 22, 2009

Make. Greeting Card Organizer

 may2208 006 How great is this project?  This card organizer has pockets for each month and has a perpetual calendar so you can use it year after year.  may2208 009 I used this tutorial with some modifications.  I relied on designer paper for decorating the organizer and in this particular one I kept the pages white to save on cost (I eventually sold this at a craft show). 

may0708 006 This is the inside of one that I made using all double sided paper.  I really love how it turned out. 

Instead of using a bind it all, I punched holes through all the pages.  I added eyelets on the front and back pages.  I used some hemp twine to tie it all together. 

may0708 004

Labels: , , , , , ,

Related Posts Widget for Blogs by LinkWithin
Bookmark and Share

Friday, July 31, 2009

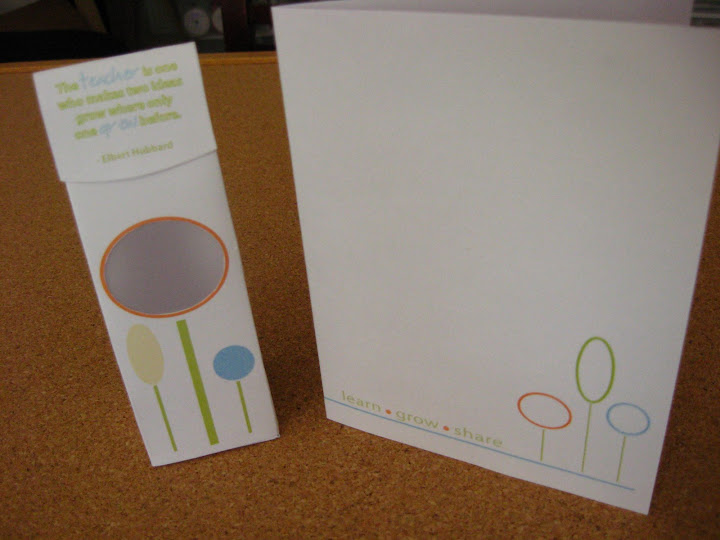
Make. Teacher Gift Box and Card Free Download

Erin Schlosser is our guest blogger today. Erin was one of my roommates at the Mom 2.0 Summit and she's been a great friend ever since! She even let me crash at her place during BlogHer. She's also half of the team behind Fresh Nest Design.

Erin made a slide show tutorial so you can see how to make this great card and teacher gift box. You can find the links at the bottom of this post for the free downloads.


Download the card here and the box template here.

Labels: , , , , , , ,

Related Posts Widget for Blogs by LinkWithin
Bookmark and Share

Tuesday, June 16, 2009

Make. Fashion Plates and Greeting Cards (giveaway!)

I went to some garage sales last weekend and found the most amazing things!  My favorite (by far) has to be the Fashion Plates.  My daughter and I have been loving playing with them.  IMG_2100 The set is perfect!  All the clothes I remember from my childhood.  It even had all of the colored pencils!  I wonder if this person even really played with it when she was little?  IMG_2101

We have tons of these little pictures all throughout the house now.  They are so much fun! 

On the back of the plates there are textures.  You can use those to color in patterns on your clothes.  I kept mine pretty simple this time around.

Something came with these fashion plates that I hadn't seen before.  It's a fashion plate greeting card maker!  IMG_2103 It has two different sized plates that you can use to make a small greeting.  There are pictures and sayings included.  It's so old that the images are starting to be back in style!IMG_2102

Included in my $2 purchase were TWO of these kits!  I'm keeping one for myself but would love to pass the other one on to one of my readers! 

Are you interested? 

Last week I introduced you to my new facebook fan page.  Become a fan and then comment here on this post if you would like to win.  I'll pick a winner on Friday, June 19th.    Good luck!

IMG_2105

Labels: , , , ,

Related Posts Widget for Blogs by LinkWithin
Bookmark and Share

Thursday, June 11, 2009

Make. Stationery Box

IMG_2086

This is a cute little box full of stationery.  I made it for a wedding gift.  You can find the pdf instructions at this site (we'll forgive her calling it a "stationary" box). 

Had I realized how easy this box was to put together, I would have made one a long time ago. 

IMG_2085Here is the box all closed up.  I used a Simply Scrappin' kit from Stampin' UP called Petal Party.  I chose this paper from my stash because the colors matched the wedding invitations.  All the paper I used came directly from this packet except for a few of the cards that go inside.  Not bad.  I also have enough paper to make at least one more complete box.


IMG_2087 This box has all sorts of little compartments.  In one of them I put a Target gift card and some tags I punched.  In the other I made some 3X3 notecards and included some mini envelopes.  The fold out section of the box features a little address book and a pocket for stamps.  You can also add a little pen holder. 

IMG_2088 Here you can see all I have included inside the box.  I'll be adding a few more full size cards to the mix before Saturday but this was all I had completed this morning as I was ready to take pictures. 

I hope the bride and groom appreciate it.  I might be a bit biased but I think it is a practical (and cute) handmade gift.  What do you think?  Would you have wanted to receive something like this when you got married? 

Labels: , , , , , ,

Related Posts Widget for Blogs by LinkWithin
Bookmark and Share

Monday, February 02, 2009

Make. Upsy Daisy Birthday Card

Upsy Daisy Birthday Card

My birthday card supply has been dwindling so I thought I would make a few cards using my Upsy Daisy stamp set. It is a great set to use with the heat embossing technique.

My color inspiration was aqua and red. As with most of my finished cards, this one didn't turn out like I first imagined it might. But, I like it. I wanted more aqua and red but it turned out that black made more sense as the main color with just red and aqua accents.

Upsy Daisy Birthday Card

Supplies used all Stampin' UP unless otherwise specified:

Paper- whisper white, cool caribbean (retired), basic black
Stamp Set- Upsy Daisy
Ink- Versamark, basic black
Adhesive- mono adhesive
Embossing powder- Stampendous Pearlustre Ruby
Accessories- Crop-a-dile large eyelets
Tools- heat gun, embossing buddy, powder pals, Crop-a-dile, paper trimmer

Labels: , , ,

Related Posts Widget for Blogs by LinkWithin
Bookmark and Share

Wednesday, January 14, 2009

Q & A. Envelope and Paper Suppliers


Today's question comes from Kaitlyn of Bright Life in Nebraska. She asked me this question via Facebook and I thought it would make a great Q & A topic.

Q: I wanted to ask you where you buy envelopes from? I usually get my stuff from PaperSource but the envelopes are $5.50 for 10. Any place cheap you know of? Or just paper material for that matter. I love PaperSources colors but not so much the prices.

A: The quick answer is, I get my envelopes from Office Depot. For just plain white invitation size envelopes, you can't beat it. You get a pack of 100 for $7.39. I usually wait for a sale or when I have a good coupon (like $10 off a $30 purchase), I stock up. If I want to fancy them up a bit, I cut a piece of decorative paper to line the inside of the flap or stamp on the outside to match the card.

For special sized cards, I make my own envelopes. This is not very difficult and is a quick project. I'll post a tutorial for that tomorrow.

There are a lot of great resources online for envelopes of all sizes.

Paper Presentation offers envelopes, folders, labels, paper, etc...

Jam Paper offers a lot of great office supplies as well.


For paper, I stick with Stampin' UP. Sure, I happen to know how to get it for a good deal (see the link above) but besides that I really love it. The colors are great, it is high quality, and the colors coordinate with all of their other products (including designer paper and stamp pads). Pictured are the Carousel Notes. They are big scallop cards with coordinating envelopes.

The Paper Mill Store has a large variety of paper and matching envelopes. They have cardstock in a variety of sizes (including 12 X 12) and a decent color selection.

I'm sure some of my readers wouldn't mind sharing their favorite paper and/or envelope resource. Where do you buy your favorite?

Labels: , , , , ,

Related Posts Widget for Blogs by LinkWithin
Bookmark and Share

Sunday, January 11, 2009

Q & A. Beginning Card Maker Supplies

This question comes from Melessa at But I Digress.

Q: My 7 year old loves to make cards. What basic supplies should I buy to get her started?

A: Great question! Starting a new hobby can be a little overwhelming with all of the supplies that are available. I hope that in this post I can give you a few ideas on how to get your child started.
This Melissa and Doug Deluxe Stamp Set is a great starter kit for kids. I actually have this kit in my Amazon shopping cart to get for my own daughter. It includes a wide variety of stamps, a few different colors of ink pads, and some colored pencils. Like most Melissa and Doug products, it comes in a wooden storage box so it should be easier to keep the supplies together. Include a pack of cardstock or some pre cut cards and she'll be ready to go!

If you don't know if stamping is the what she'd like to do, you might stock up on some great paper and stickers.


You can usually find good deals on these "stacks" at the big craft stores. I'm still using up paper from a 12 X 12 stack I bought over 2 years ago.

The great thing about making cards is that you really don't many tools. *I can't believe I wrote that as I'm surrounded by lots and lots of tools that I use to make cards* What I should say is that to make most cards, only a few essential tools are necessary. The most important would be scissors and adhesive. As the parent, you'll have the best idea on what kinds of tools are appropriate for your child to handle so I won't go into too much detail on the tools.

If she's ready to take it to the next level, I'd introduce ribbons, buttons, and/or brads. These are fun and easy embellishments that can really add a lot to a card (and make your daughter feel like a craft superstar).


Have a craft question for me? Email me at christy AT christynelson DOT net

Labels: , , , ,

Related Posts Widget for Blogs by LinkWithin
Bookmark and Share

Monday, December 22, 2008

Q & A. How Should I Wrap Up Handmade Cards?

This will hopefully be the first of many Q & A sessions here on christynelson.net. The very first question is brought to us by Kristi of the Perkins Clan.

Q: I made some cards for my mom for Christmas, and I'm trying to figure out how to package them. Any suggestion, craft queen?
Thanks!
Kristi

A: What a great question! There are so many great options out there and it can be a little overwhelming. We're talking about standard 4 1/4" X 5 1/2" cards (A2) right now so my suggestions will fit that particular size. However, many of these options can be sized up or down to fit whatever size cards you prefer to make.


1. Card Box. This box was made using the tutorial from Splitcoast Stampers. The tutorial also includes ways that this box can be scaled down for cards of other sizes. This sort of wrapping is also a great idea because you can have the box match the cards and be a part of the actual gift. It is always nice to have something pretty to hold cards.

2. Tote Box. This cute little paper tote is perfect for holding a set of handstamped cards. There is a video tutorial at the Chic N' Scratch Stampin' Academy.

3. Other box templates. This webpage has a list of packaging templates to fill a wide variety of box needs.

saffron thank you set

4. Ribbon. Never underestimate the power of ribbon. Simplicity at its finest. This is how I "wrap" most of my card sets. The reason? I have lots of ribbon and I'm lazy. Actually, by the time I finish making the cards, the last thing I want to do is make something to put them in. I realize that this option isn't always the best choice.


5. Card File Box. Probably not the most attractive option but for sheer functionality, this is a great option. I use one of these in my office to organize all the cards I forget to send out. They come with dividers so you could even label the dividers for the card topics: birthday, thank you, congratulations, get well, etc... I'm sure if you had time, or wanted to, you could fancy up the container a bit.

Do you have a crafty question you'd like me to answer in a blog post? Email me:

christy AT christynelson DOT net

Labels: , , , ,

Related Posts Widget for Blogs by LinkWithin
Bookmark and Share