Thursday, June 11, 2009

Make. Stationery Box

IMG_2086

This is a cute little box full of stationery.  I made it for a wedding gift.  You can find the pdf instructions at this site (we'll forgive her calling it a "stationary" box). 

Had I realized how easy this box was to put together, I would have made one a long time ago. 

IMG_2085Here is the box all closed up.  I used a Simply Scrappin' kit from Stampin' UP called Petal Party.  I chose this paper from my stash because the colors matched the wedding invitations.  All the paper I used came directly from this packet except for a few of the cards that go inside.  Not bad.  I also have enough paper to make at least one more complete box.


IMG_2087 This box has all sorts of little compartments.  In one of them I put a Target gift card and some tags I punched.  In the other I made some 3X3 notecards and included some mini envelopes.  The fold out section of the box features a little address book and a pocket for stamps.  You can also add a little pen holder. 

IMG_2088 Here you can see all I have included inside the box.  I'll be adding a few more full size cards to the mix before Saturday but this was all I had completed this morning as I was ready to take pictures. 

I hope the bride and groom appreciate it.  I might be a bit biased but I think it is a practical (and cute) handmade gift.  What do you think?  Would you have wanted to receive something like this when you got married? 

Labels: , , , , , ,

Related Posts Widget for Blogs by LinkWithin
Bookmark and Share

Wednesday, May 13, 2009

For Sale. Retired Stampin' Up Stamp Sets

In the great craft room cleanup, I've got quite a load of retired Stampin' Up stamp sets that need new homes.  Before I take the time and effort to list them all on etsy or ebay, I thought I'd post the list here to see if there are any takers.  I will certainly discount if you want to purchase multiple sets.  Comment here or email me to claim your sets. 

Each set is in a varying degree of use.  Some are new and unmounted (NUM).  Others are barely used but mounted.  Some are well worn and stained but not to the point of taking away from their usefulness.  If asked, I will provide pictures of specific sets you might be interested in.  Otherwise, I'll be linking to various images online. 

Shape Ups $5                                              You Are My Sunshine $15

Event Full $10                                            Double Line Doodles $20

Fun Filled $10                                             Amazing to Zany $35

Bodacious Bouquet  comes with Classy Brass Template for dry embossing $40

Retro Alphabet (lowercase) $25                   Checked Frame (no clamshell) $5

Chore Chart comes with lots of copies of the monthly calendars $40

Big Blossom $8                                               Baby Firsts $10

Birthday Whimsy $12                                 Friendship Blooms (NUM) $15

Lots of Thoughts $8                                     Love Matters $10

Polka Dots and Paisley $8                          So Many Scallops  $8

Tag Time $15                                                  Time Well Spent (NUM) $20

Terrific Tags (no clamshell) $5

Labels: , ,

Related Posts Widget for Blogs by LinkWithin
Bookmark and Share

Thursday, April 30, 2009

Learn. How to Make Matchbook Favor Boxes.

May Day is tomorrow and Nebraskans know how to do it right!  This is the first place I've lived where people celebrate May Day and I love it!  Who doesn't want springtime goodies to show up on their doorstep? 

Last year I made some pixie stick baskets.  They were really cute and fast.  I decided to go with that theme again this year.  Cute and fast.

I have the Stampin' UP matchbox die that is available in the Occasions Mini catalog right now.  A couple of years ago I was making these boxes by hand.  I would work all evening and maybe finish 3 or 4.  With this die, I can finish that many in less than 30 minutes.

IMG_1963Isn't this one of the cutest things you've ever seen?  I totally CASEd this one from this post.   I used the Matchbox die and also the flowers #3 die to make the flower embellishment.  I used a jumbo eyelet, some wide grosgrain ribbon, stamped a little tag, and tied it on with linen thread.  I used some double sided designer paper to make the box. 

There are millions of ways to embellish and use these little boxes.  I was just thinking it would be cute to actually use them as a matchbox.  You could put matches in it and gift it along with a pretty candle.  How's that for a Mother's Day idea? 

I'm not going to show you the step by steps on how to embellish.  I'm just going to show you how to use the die cut machine and how to assemble this particular die. 
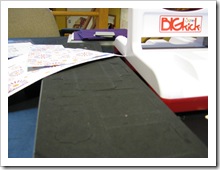
IMG_1958 This is what the die looks like.  It is long and has one side covered in foam.  That's the working side.  That is where you will place whatever it is that you want to cut out.  IMG_1959


Now you'll make a sandwich with your clear cutting plates.  From bottom to top you'll have:

  1. clear cutting plate
  2. die, foam side up
  3. item to be cut (paper, fabric, felt, etc)
  4. clear cutting plate

IMG_1960You'll place that sandwich into your die cutting machine and roll it through.  Lickety split and you'll have your cut out box.

To assemble your box, you'll need to cut through the corner perforations and score at all of the score lines.  The score lines are placed exactly where you need them when you run the die cut through the machine. 

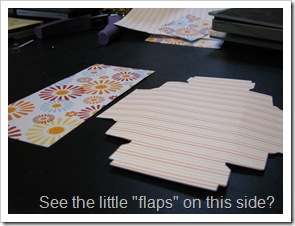
Use a bone folder to make your creases sharp.  All of the creases go one way except for the tiny scores on each side flaps (see above picture) and on top of the sides.  Those flaps help hold the box together.  If you are making your box out of cardstock, I've found that the friction enough is sufficient to keep the box together.  When using designer papers, you'll want to add some adhesives. 

Apply adhesive to the outermost edge of all sides.  The adhesive goes on the wrong side of the paper.  The you'll fold down the longer sides first.  The corners get folded underneath the smaller sides.  This is where those small flaps will be.  They need to be scored the other way so they can provide support in the corners. 

Score the lid at the lines and use adhesive at one edge to form your cover.  Fill your box with goodies and slide the cover over the top. IMG_1962

Embellish!

For this one I made two lids.  One was out of plain red cardstock and the other out of designer paper.  I used an EK Success edge punch on the sides to make the little extra detail you see in the picture. 

If you're celebrating May Day this year, why not leave some treats in a matchbox you made yourself?

Labels: , , , , , , , , ,

Related Posts Widget for Blogs by LinkWithin
Bookmark and Share

Tuesday, April 21, 2009

Craft Night with the Lincoln Handmade Team

IMG_1918

I'm a member of our local etsy team, Lincoln Handmade.  Last night we all got together at my house for a craft night.  We spent most of the evening using the Big Kick, eating, and chatting.   You can read more about it at the Lincoln Handmade blog.  

IMG_1921

The Big Kick was the hit of the evening.  I bought mine on sale a couple of months ago at Joann. It is a die cutting machine.  It is great to use with paper, fabric, chipboard, felt, and whatever else you can run through it.   You can make appliques like a dream!  TIP: add your heat n bond to the fabric BEFORE you run it through the machine.  Then you have a ready to iron on shape!

The dies can be purchased at craft stores.  I have a few that are exclusive to Stampin' UP that match their stamp sets.  The dies can get a little expensive.  Most run around $15.  Make sure to use your craft store coupons!  Alphabet and other specialty dies can cost over $100.  We were talking about maybe charging dues for our team and investing in some of these more expensive tools for the good of the group.

This is actually a pretty good price for the Big Kick if you're interested.  Do you have one already?  What are some of your favorite dies?

Labels: , , , , , , , , , ,

Related Posts Widget for Blogs by LinkWithin
Bookmark and Share

Friday, March 27, 2009

Paper Punch Storage Idea

I used to store all of my paper punches on a shelf. This quickly invited all the little hands in my house to play with them. They are sturdy enough that I was never worried that they would break, it was just a pain to try and find them again somewhere on my floor. I wanted to mount them somehow on the wall.

A few months ago we remodeled our bathroom and we had a leftover towel bar. We decided to install the towel bar in my craft room because it is the perfect thing to hold my Stampin' UP paper punches.

************************************************************************

Reminder: Today is the last day to buy your April craft challenge packet! Today is also the last day to vote for the winner of March's craft challenge. I will close the poll before I go to bed tonight.

Labels: , , , , , ,

Related Posts Widget for Blogs by LinkWithin
Bookmark and Share

Tuesday, March 10, 2009

Virtual Stamp Workshop Yummy Treat Box

Yummy Treat Box

Here is the second of the projects for Raesha's Virtual Stamp Workshop. This treat box is so quick and easy!

Supplies:
Yummy Stamp Set (one of the sets you can get for FREE with any $50 order)
Big Shot Die Cut Machine
Box #2 Bigz XL Die
one piece of Bashful Blue cardstock cut to 6" X 11"
scrap of Whisper White cardstock
Classic stamp pad in Riding Hood Red
Scissors
1/4" white grosgrain ribbon (20 inches)
adhesive

You'll notice from yesterday's post that most of these supplies are the same! With just a core set of tools and papers, you can make a wide range of projects.


Tart and Tangy Treat Pouch Tutorial

1. Place bashful blue cardstock over the box #2 die and run through the Big Shot machine.
2. Score at marked score lines (shown above).
3. Stamp "Yummy" sentiment using Riding Hood Red ink onto white paper.
4. Cut out design with scissors.
5. Use adhesive to attach sides of box. This is a great die cut because you only have to tape in two small areas.

Tart and Tangy Treat Pouch Tutorial

6. Apply tape to one end of the grosgrain ribbon. Place it on the back of the box. Wrap the ribbon around, overlap the ends, trim, and adhere using more tape. See above for an example of this.
7. Adhere stamped cut-out to the front of the box.
8. Using the remaining ribbon, tie a small piece around the ribbon going around the box using a square knot.
9. Fill the box with yummy treats!
10. Give it away!

Remember, all orders placed at my Stampin' UP website until Thursday will count towards Raesha's virtual workshop. All orders will be sent directly to you. Take advantage of Sale-a-bration and get extra product for free with every $50 purchase. It's my favorite time of the Stampin' UP year!

Labels: , , ,

Related Posts Widget for Blogs by LinkWithin
Bookmark and Share

Monday, March 09, 2009

Virtual Stamp Workshop Tart & Tangy Treat Pouch

Yummy Treat Box and Tart & Tangy Pouch

Over the next few days I'll be helping Raesha, at My Love, host a virtual stamp workshop. She does the hosting...I do the workshop. Over the next two days, I'm going to show you how to make these two cute items. The one on the left is a box and the one on the right is a pouch to hold a baggie of goodies. I wanted to show something that was quick and easy to make that would most likely use most of the same supplies you already have.

Today I'll show you how I made the pouch on the right. Come back tomorrow for the box of yummy treats.

Supplies:

Tart & Tangy Stamp Set
one piece of Bashful Blue cardstock cut to 4" X 11"
Washington Apple Designer Series Paper cut to 4" X 4"
scrap of Whisper White cardstock
scrap of Riding Hood Red cardstock
Classic stamp pad in Riding Hood Red
Scallop punch
1 3/8" circle punch
1/4" white grosgrain ribbon (6 inches)
Crop-a-dile (or other hole punch)
adhesive

Tart and Tangy Mosaic

1. Lay Bashful Blue cardstock out lengthwise and score at 4", 5", and 9".
2. Adhere Washington Apple DSP to the 4 X 4 section of your pouch.
3. Stamp apple using Riding Hood Red ink pad on your white paper. Punch out using 1 3/8" circle punch.
4. Punch a scallop circle out of Riding Hood Red paper.
5. Use adhesive to attach white circle to scallop circle.
6. Fold over your pouch. Be careful to only apply adhesive to the top half of your stamped scallop. Attach to the flap of the pouch.
7. Use Crop-a-dile to punch a hole in the side through front two layers of paper only.
8. Tie with ribbon.
9. Wrap this around a little baggie of goodies.
10. Give it away!

Labels: , , ,

Related Posts Widget for Blogs by LinkWithin
Bookmark and Share

Saturday, February 14, 2009

Learn. How to Make a Pendant With Hodgepodge Hardware

Hodgepodge Hardware Pendant

I was inspired to make a pendant using hodgepodge hardware from Stampin' UP after seeing such great pendants popping up all over the place. I didn't really know what I was doing and I was winging it. Considering my lack of plan, I think it turned out really well.

Hodgepodge Hardware Pendant

Supplies used:

2 pieces oval hodgepodge hardware in silver
2 brads from the hodgepodge hardware were also used to hold it together while it dried
small scrap of double sided designer paper
chipboard heart
classic ink (color rose red)
crystal effects
marker


The great thing about this kind of pendant is that they should really be designed to be one of a kind. So, think of these instructions as a guide to help you create a pendant that is perfect for you!

The first thing you'll want to do is cut your paper to fit inside the hardware. You can embellish it however you please. This would be really cute as an initial pendant, too. I chose a chipboard heart. I used my stamp ink to color it red and then adhered it to the paper using crystal effects.

At this time, I sandwiched the paper in between the hardware and began filling the oval (with the chipboard heart) with crystal effects. If you do this slowly, it will pool and make a glassy smooth finish. To hold the pieces of hardware together, I put two brads in the holes.

Set it aside to dry.

Hodgepodge Hardware Pendant (reverse side)

The next day I worked on the reverse side. This can be a truly reversible pendant and that is why I chose double sided paper. I only had to use one small scrap to make this. I took a marker and wrote the word "Love" on the back. I then did the same thing with the crystal effects as the other side and filled in the oval. I set that aside to dry.

This is a fun project to let your creativity run wild. Turn your hardware the other way and add beads to the bottom to have a dangling pendant. Use the square hardware for a completely different look. Instead of adding a chain, use your beading skills and make your own necklace to match.

Inspired to make your own? Share pictures of your finished project here.

Labels: , , , , ,

Related Posts Widget for Blogs by LinkWithin
Bookmark and Share

Monday, February 02, 2009

Virtual Stamp Workshop

Stampin' Up's Sale-a-Bration is going on now through March 31st. With every $50 order, you can choose one item from the sale-a-bration catalog for free.

It is the BEST time of the year to buy products from Stampin' UP. You can order online at my website or contact me via email to place an order.

If you're interested in hosting a virtual stamp workshop, leave a comment with your contact information or email me at christy AT christynelson DOT net. I think it would be fun to do during this promotion.

What You Do:
  • You "host" on your blog by inviting your readers to order from my Stampin' UP website.
  • You don't have to clean your house, collect orders or money, or deliver product.
What I Do:

  • I will post a special stamp project on your blog.
  • I will send you a brand new Spring/Summer idea book and catalog
  • I will give you 20% off anything you want to order regardless of whether or not anyone else orders.
  • I will give you hostess benefits based on the sales generated from your blog.

Labels: , , ,

Related Posts Widget for Blogs by LinkWithin
Bookmark and Share

Make. Upsy Daisy Birthday Card

Upsy Daisy Birthday Card

My birthday card supply has been dwindling so I thought I would make a few cards using my Upsy Daisy stamp set. It is a great set to use with the heat embossing technique.

My color inspiration was aqua and red. As with most of my finished cards, this one didn't turn out like I first imagined it might. But, I like it. I wanted more aqua and red but it turned out that black made more sense as the main color with just red and aqua accents.

Upsy Daisy Birthday Card

Supplies used all Stampin' UP unless otherwise specified:

Paper- whisper white, cool caribbean (retired), basic black
Stamp Set- Upsy Daisy
Ink- Versamark, basic black
Adhesive- mono adhesive
Embossing powder- Stampendous Pearlustre Ruby
Accessories- Crop-a-dile large eyelets
Tools- heat gun, embossing buddy, powder pals, Crop-a-dile, paper trimmer

Labels: , , ,

Related Posts Widget for Blogs by LinkWithin
Bookmark and Share