Tuesday, September 22, 2009

Make. Greeting Card Organizer

 may2208 006 How great is this project?  This card organizer has pockets for each month and has a perpetual calendar so you can use it year after year.  may2208 009 I used this tutorial with some modifications.  I relied on designer paper for decorating the organizer and in this particular one I kept the pages white to save on cost (I eventually sold this at a craft show). 

may0708 006 This is the inside of one that I made using all double sided paper.  I really love how it turned out. 

Instead of using a bind it all, I punched holes through all the pages.  I added eyelets on the front and back pages.  I used some hemp twine to tie it all together. 

may0708 004

Labels: , , , , , ,

Related Posts Widget for Blogs by LinkWithin
Bookmark and Share

Friday, September 18, 2009

CHA Summer Report: DinoTalk Talking Envelopes

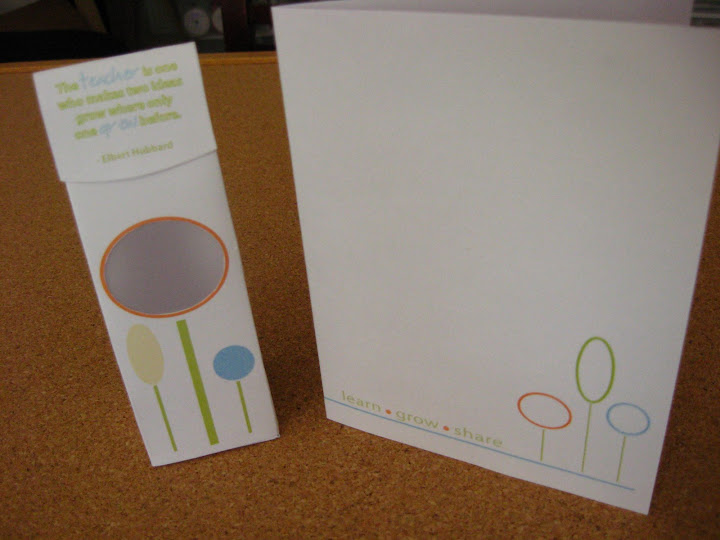
I was sent a few of these recordable gift card holders to check out after I saw them at CHA and I must say, I love them!  A few months ago I was looking for a recordable card to give to my daughter's teacher.  She loves to hear my daughter's laugh so I though it would be fun to record that for her.  The recordable cards I found in the stores (if they had any!) were expensive ($6-$8) and weren't appropriate for our occasion.  I wish I had known about these back then!  They have a whole line of recordable products so you can even make your own recordable cards with their paper! 

Check out this video I made (with my daughter's help) featuring this product and what I did with it. 

This is a brand new product and I'm still waiting to hear back on where it will be available.  I'll keep you all posted!  In the meantime, I've got an extra one that I'll send to a facebook fan.  Become a fan before Sept. 23rd to enter!

Labels: , , , , , , ,

Related Posts Widget for Blogs by LinkWithin
Bookmark and Share

Monday, August 24, 2009

Learn. How to Make a Pinata From a Balloon.

aug20-22 014

This is my August Craft Challenge entry. I sent out all the purple tissue paper I had so I used yellow for mine. You also can't really see the details in this picture so I thought I'd give a step by step.

My former resident of Mexico and Spanish teacher self loves pinatas. I've made them out of jarras (clay pots), cardboard, and balloons. Using a balloon is the best choice for a quick and easy pinata.

Supplies:

  • balloon
  • newspaper
  • papier mache paste (recipe below)
  • tissue paper
  • household glue

IMG_2485

Papier Mache Paste Recipe

Mix 1/2 cup of flour with 2 cups cold water. Bring 2 more cups of water to a boil. Add your flour mixture. Stir until boiling. Remove from heat, pour into a bowl, and let cool. Some recipes out there add sugar after boiling. I've tried both ways and it doesn't seem to make much of a difference. If I have it nearby, I add it. If not, I don't.

While your paste is cooling, blow up a balloon and tear 2 inch wide strips of newspaper.IMG_2486 As you can see, my daughter did a lot of the work. She was so excited to help and it was a good project for her to work on now that big brother is back in school.
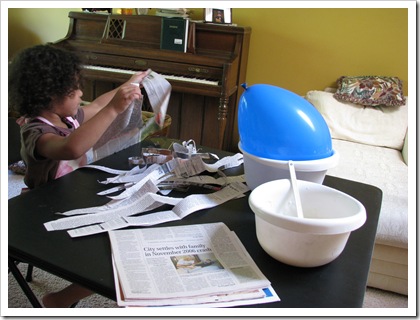
What you do next is the fun and messy part. Spread the paste on one side of the paper strips and start to cover the balloon.

IMG_2487 You'll want to make one solid layer and then let it dry overnight. Do another layer the next day. Another layer the next. Did I mention that making a pinata takes a little bit of planning? You'll want at least 3-4 days of lead time. To be honest, I did two layers in one day. That worked out okay but it wasn't ideal.

When you are making your layers, be sure to leave an opening at one end of the balloon. I chose the tapered end. You'll need this opening for the candy!

When your layers are completed and dry, pop the balloon and pull it out. Now you're ready to decorate!

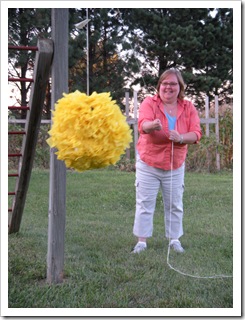
IMG_2488 For this one, I wanted it to look like a big pom pom or flower. I took the tissue paper squares, pinched them in the middle, dipped them in a bit of Elmer's glue and stuck them to the pinata.

I added pom poms (the white bits) around it, too. In this photo you can also see the card I made to go with the pinata. I made this for Deb's 30th birthday party. The eyelet is on the card and I strung it onto the rope.

I filled it with candy (gum & starburst). I added the gold coins to the inside as well. When the kids broke open the pinata, if they found a gold coin they got to choose a full-size candy bar. I thought it was a nice touch.

I used the craft sticks to hold the rope. I stuck them in the hold and tied the rope to the sticks. They didn't last very long. After one or two people, the sticks broke and we had to replace with a heavier duty dowel.
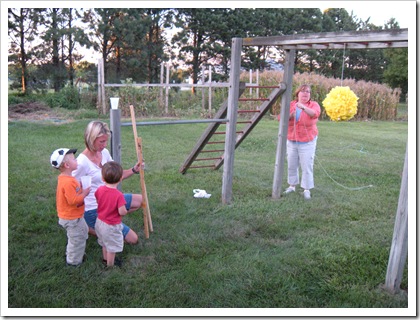
aug20-22 013 Everyone really enjoyed the pinata and it was a blast to make!

Have you finished your August Craft Challenge yet? You have until Wed. Aug 26th. If you'd like to participate in next month's challenge, you can purchase your packet in my etsy shop.

Labels: , , , , , , ,

Related Posts Widget for Blogs by LinkWithin
Bookmark and Share

Friday, August 14, 2009

CHA Summer Report: eCraft from Craftwell Inc.

cha summer 045

My name is Christy and for years I lived a perfectly happy existence without a personal cutting system.  One trip to CHA and that has all changed.  I'm starting to question whether or not I've been truly happy without one.  Or, maybe I'm lucky because this brand new product from Craftwell is going to make the wait worth it! 

Here are the details for their product, the eCraft Personal Cutting System:

  • no cutting mats!
  • no cartridges!  It uses an SD card with pre-loaded images
  • automatic paper feeder!  You can set down a bunch of paper and let it go to town! 
  • no limit to the length of the paper!  They had it set up with a roll of paper 150 feet long and it would just feed through the paper.  How about that?  Think of all the super long banners you could make!
  • with the eCraft Pro software you can USE YOUR OWN DESIGNS! 
  • should be available in the stores before the holidays.
  • cuts paper, cardstock, and vinyl
  • depending on the model this will cost anywhere from $249 to $399 (suggested retail).  SD cards will retail for around $39. 
  • it can draw and cut!

Here is a video from the company that shows some of the things it can do.

I'm sure this won't be the last you hear of the eCraft on this blog.  They are going to need some craft bloggers to test this out when it is ready to come out and I've already got my hand raised high!

Labels: , , , , , , ,

Related Posts Widget for Blogs by LinkWithin
Bookmark and Share

Friday, August 07, 2009

Learn. How to Heat Emboss.

One of my very first tutorials on this site was to show how to dry emboss. This past week my best friend, Tiffany, was here to visit. We had an impromptu "class" on how to heat emboss and we filmed it for the site.

Supplies needed:
  • Stamps
  • Versamark ink pad
  • Cardstock
  • Embossing powder
  • Heat gun

Labels: , , , , ,

Related Posts Widget for Blogs by LinkWithin
Bookmark and Share

Friday, July 31, 2009

Make. Teacher Gift Box and Card Free Download

Erin Schlosser is our guest blogger today. Erin was one of my roommates at the Mom 2.0 Summit and she's been a great friend ever since! She even let me crash at her place during BlogHer. She's also half of the team behind Fresh Nest Design.

Erin made a slide show tutorial so you can see how to make this great card and teacher gift box. You can find the links at the bottom of this post for the free downloads.


Download the card here and the box template here.

Labels: , , , , , , ,

Related Posts Widget for Blogs by LinkWithin
Bookmark and Share

Thursday, July 30, 2009

Learn. How to Make Napkin Rings Out of Paper Towel Rolls

The guest blogger today is Nova, Glass Half Full Gal. We follow each other on twitter and have all sorts of crafty conversations! Nova's so crafty she did about 8 different crafts before settling on this one. Enjoy!

IMG_0299I love to reuse and recycle. Though, where we live in the country a convenient recycling program. So, I'm bigger on reusing items. I think everyone can come up with a use for empty paper towel holders. The most common is probably binoculars. My son has created them on his own quite often.

Napkin ring holders are a great craft that kids can participate in making. Hosting a family dinner or event? Crafts like this keep the kids busy while you tend to the menu and are decorative table art too!

For my summer napkin ring holders, I'm using a ladybug to decorate the top of the ring. If you have a die cut for this pattern, it will make things a snap.

IMG_0300 Supplies:

Empty paper tower roll (this will make 7 napkin rings at 1 1/2 inches in length)

White acrylic paint

Cardstock: Black, Red

Ladybug die cut (or cut out manually)

Hole-punch (if you don't have a die cut)

Black or silver pipe cleaner (chenille sticks)

Googlie eyes (optional)

Cut your empty paper towel holder at 11/2 inch increments to make 7 rings.

Paint your napkin ring holders with acrylic paint. I prefer white, however, the color may vary depending on how you plan to decorate your ring.

Cut one black circle and one red circle for each ladybug body. I used my Sizzix Originals Circles #2 die to cut a circle at about 1 3/4 inches in diameter. I then used the smallest circle on the die to cut out two black circles for heads (about 3/4" in diameter).

IMG_0298Cut out a triangular section for the wings on one side of each of the red circles. Punch two holes on each wing for each red ladybug body. I used a larger hole-punch for the back and a smaller for the front. These make the black spots on the ladybug. Adhere the red body circle to the solid black body circle. I used 'sticky do' foam dimensional adhesives to give the ladybug some dimension. You can paint eyes on your ladybug head or leave black. I used googlie eyes on mine for a fun affect for the kids.

Cut a piece of chenille stick about an inch long. I folded the ends to make the tips of the antennae and then folded the piece in half. Attach to the back of the ladybug head. Attach the head to the body. Now, simply use craft glue or an adhesive of your preference to attach the ladybug to the painted napkin ring.

Other ideas you can do are to adhere jewels, or paint an initial as a monogram. Decorate with patterned designs with glitter glue. Wrap ribbon around the ring to fancy it up at bit.

I did a few of these for demonstration. The options are endless!

Nova Ordner a/k/a Glass Half Full, formerly owned and ran a Litigation Record Procurement Company for 12 years. Currently, she is a Household Manager, mother of two children and wife to a farmer. Nova is also proud to be a Team Writer for Root & Sprout. She's an optimist who sees life from the greener side. She's a Glass Half Full Gal.

Labels: , , , , , ,

Related Posts Widget for Blogs by LinkWithin
Bookmark and Share

Wednesday, July 01, 2009

Q & A. Wizard of Oz Die Cuts Ideas

It's been a while since we've had a Q & A post.  This time the question comes from me.  IMG_2146 My kids are obsessed with the Wizard of Oz.  I stopped in at my local scrapbooking store and saw these.  I knew I had to get them.  I got two sets.  They also include the Wicked Witch.

IMG_2147

Have I mentioned here that my son loves to throw water on me when he's upset?  He tries to make me melt.  I try to tell him that good witches don't melt.  He never seems convinced. 

So, I'm wondering what to do with these.  Any suggestions?  So far all I can come up with is attaching them to craft sticks and making them into little puppets.  I'm guessing they are about 4 inches tall. 

What would you do with these?

Labels: , , , ,

Related Posts Widget for Blogs by LinkWithin
Bookmark and Share

Thursday, June 11, 2009

Make. Stationery Box

IMG_2086

This is a cute little box full of stationery.  I made it for a wedding gift.  You can find the pdf instructions at this site (we'll forgive her calling it a "stationary" box). 

Had I realized how easy this box was to put together, I would have made one a long time ago. 

IMG_2085Here is the box all closed up.  I used a Simply Scrappin' kit from Stampin' UP called Petal Party.  I chose this paper from my stash because the colors matched the wedding invitations.  All the paper I used came directly from this packet except for a few of the cards that go inside.  Not bad.  I also have enough paper to make at least one more complete box.


IMG_2087 This box has all sorts of little compartments.  In one of them I put a Target gift card and some tags I punched.  In the other I made some 3X3 notecards and included some mini envelopes.  The fold out section of the box features a little address book and a pocket for stamps.  You can also add a little pen holder. 

IMG_2088 Here you can see all I have included inside the box.  I'll be adding a few more full size cards to the mix before Saturday but this was all I had completed this morning as I was ready to take pictures. 

I hope the bride and groom appreciate it.  I might be a bit biased but I think it is a practical (and cute) handmade gift.  What do you think?  Would you have wanted to receive something like this when you got married? 

Labels: , , , , , ,

Related Posts Widget for Blogs by LinkWithin
Bookmark and Share

Thursday, April 30, 2009

Learn. How to Make Matchbook Favor Boxes.

May Day is tomorrow and Nebraskans know how to do it right!  This is the first place I've lived where people celebrate May Day and I love it!  Who doesn't want springtime goodies to show up on their doorstep? 

Last year I made some pixie stick baskets.  They were really cute and fast.  I decided to go with that theme again this year.  Cute and fast.

I have the Stampin' UP matchbox die that is available in the Occasions Mini catalog right now.  A couple of years ago I was making these boxes by hand.  I would work all evening and maybe finish 3 or 4.  With this die, I can finish that many in less than 30 minutes.

IMG_1963Isn't this one of the cutest things you've ever seen?  I totally CASEd this one from this post.   I used the Matchbox die and also the flowers #3 die to make the flower embellishment.  I used a jumbo eyelet, some wide grosgrain ribbon, stamped a little tag, and tied it on with linen thread.  I used some double sided designer paper to make the box. 

There are millions of ways to embellish and use these little boxes.  I was just thinking it would be cute to actually use them as a matchbox.  You could put matches in it and gift it along with a pretty candle.  How's that for a Mother's Day idea? 

I'm not going to show you the step by steps on how to embellish.  I'm just going to show you how to use the die cut machine and how to assemble this particular die. 

IMG_1958 This is what the die looks like.  It is long and has one side covered in foam.  That's the working side.  That is where you will place whatever it is that you want to cut out.  IMG_1959


Now you'll make a sandwich with your clear cutting plates.  From bottom to top you'll have:

  1. clear cutting plate
  2. die, foam side up
  3. item to be cut (paper, fabric, felt, etc)
  4. clear cutting plate

IMG_1960You'll place that sandwich into your die cutting machine and roll it through.  Lickety split and you'll have your cut out box.

To assemble your box, you'll need to cut through the corner perforations and score at all of the score lines.  The score lines are placed exactly where you need them when you run the die cut through the machine. 

Use a bone folder to make your creases sharp.  All of the creases go one way except for the tiny scores on each side flaps (see above picture) and on top of the sides.  Those flaps help hold the box together.  If you are making your box out of cardstock, I've found that the friction enough is sufficient to keep the box together.  When using designer papers, you'll want to add some adhesives. 

Apply adhesive to the outermost edge of all sides.  The adhesive goes on the wrong side of the paper.  The you'll fold down the longer sides first.  The corners get folded underneath the smaller sides.  This is where those small flaps will be.  They need to be scored the other way so they can provide support in the corners. 

Score the lid at the lines and use adhesive at one edge to form your cover.  Fill your box with goodies and slide the cover over the top. IMG_1962

Embellish!

For this one I made two lids.  One was out of plain red cardstock and the other out of designer paper.  I used an EK Success edge punch on the sides to make the little extra detail you see in the picture. 

If you're celebrating May Day this year, why not leave some treats in a matchbox you made yourself?

Labels: , , , , , , , , ,

Related Posts Widget for Blogs by LinkWithin
Bookmark and Share

Monday, April 06, 2009

Make. Paper Buildings from The Paper Architect

IMG_1796 I wanted to try out a new craft for National Craft Month.  March passed by quickly but I didn't forget about my goal.  I decided to try my hand at becoming a paper architect.  I used the book, The Paper Architect from Potter Craft books.  

The projects looked challenging but accessible because all you need are paper and cutting tools.  The book has templates for all of the projects and you can either cut those directly, or copy them onto cardstock.  I decided to make some copies so I could practice.

IMG_1795 

The Golden Gate Bridge is the first project in the book and is listed as "easy".  It looks a little intimidating with all of the small cuts.  But, I've found that the cutting out isn't as difficult as the folding.  That's why this one was easy because is has few folds.  You can see that my cutting isn't that great.  I need some new blades.  Also, the cardstock I used isn't the best quality.  If I was going to make this for something other than just practice, I would have better cardstock and a new blade.  This took me just over an hour to finish. 

IMG_1794

I got a little addicted and decided to move on to another easy project, the Eiffel Tower.  Now that I have the picture cropped and zoomed, I can see all the places I would like to improve.  I used a different sized blade for this one and I should have kept the other one.  I still think it is pretty darn good for my second one, ever. 

The book is really interesting because it includes information about the real life architecture.  If you've got teenagers that you're willing to let use an exacto knife, this might be a good book for them. 

The actual cut-outs are rather small.  I think I'm going to try and make some cards with these on the inside so they will pop up when you open them.  But first, I'm going to practice some more because I really, really want to make this one.

IMG_1797

That's The Sagrada Familia cathedral.  It is found in Barcelona in real life.  It is for the advanced paper cutter.  Maybe I should work my way up by completing Chichen Itza or the Parthenon. 

Here's the link again to the book if you think you'd like to try out these projects for yourself! 

Labels: , , ,

Related Posts Widget for Blogs by LinkWithin
Bookmark and Share

Friday, April 03, 2009

Q & A Formula Can Crafts

A while ago, Kristi from The Perkins Clan asked me a question for me to answer here on Q & A.  By the time I had gathered some formula cans and started to work on some projects, she had her own flash of inspiration and used some to keep puzzle pieces and toys organized.  I had a few ideas myself and today I'll show you one of the options I came up with.

My kids are of the age now where they are getting the concept of money.  They like to go to the store and buy things.  We're trying to teach them how to save for things and in our family, we tithe 10% of our income.  I wanted a way for them to be able to have a piggy bank where they can divide their money between what they can spend and what they should tithe. 

  The bank I made for my son is beaded.  To help me with the beading, I used the Tool-Light.  More about that later…

I used 12.9 oz formula cans.  You'll want to make sure they are cleaned out and you can rip off the outer paper. 

Cut a strip of paper 4 3/8" X 13 1/2".  This will wrap all the way around.  I didn't have any paper that length so I used a 12 X 12 inch piece and cut an extra 1 1/2 inches to cover the seam.   Just add glue to the wrong side of the paper and then roll the can over the top of it.  Press to get out any air bubbles.  Set aside to dry.

I added a double-sided sticky shape to the can.  Attach one side but leave the red backing on until you're ready to cover it with beads or glitter.  Once you take  it off, you can start placing the beads. 

I used the tool-light to help me with this.  It did an okay job of picking up the beads but it wasn't as easy as I thought it would be.  I actually did a better job using my fingers.  I'm going to give tool-light the benefit of the doubt and think that maybe I didn't choose the right project.  However, I don't know if I'll be able to use it again because my husband wants it for his own tool box.  They are well made and come with plenty of batteries so you don't have to worry about the lights going out anytime soon.  If you are a jeweler or are in need of tweezer type tools for your craft, they are worth a look.  The light is such a great bonus!

3382695091_9fd82e862c I made another one for my daughter.  She picked out the paper herself.  I used scissors to cut the coin slots in the lid.  We glued a piece of paper inside the can to separate the two areas.

I had some pom-pom fringe leftover from the February Craft Challenge.  I think it turned out really well.  I used a ribbon instead of another strip of paper to cover the seam on this bank.

I have a lot more ideas (and cans!) for this Q & A so you'll be seeing more formula can crafts here over the next several days.  Do you have a favorite way to use your leftover cans? 

You have a little while longer to get in on the Martha Stewart book giveaway.  Comment here. 

Labels: , , , , , , ,

Related Posts Widget for Blogs by LinkWithin
Bookmark and Share

Tuesday, February 03, 2009

Make. No Sew Valentine Heart Garland

No Sew Valentine Heart Garland

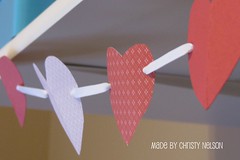
This heart garland was made because I am mostly a lazy crafter. I wanted to make a little heart garland like some I've seen where they sew paper in a sewing machine. But, I realized that I have blue thread in my machine and I was too lazy to change it. Instead, I came up with a different way to hang my heart garland and I like it a lot!

No Sew Valentine Heart Garland

You need the most basic of supplies. Paper, scissors, ribbon, and a hole punch. I used double sided designer paper and regular red cardstock. I strung them on 1/4" white grosgrain ribbon.

No Sew Valentine Heart Garland

Remember how to cut out hearts? I cut my paper into 3" X 6" pieces (more or less--I stopped measuring after a while) and folded it in half. I just free handed cutting out the hearts. This would be a great project to do with your scissor trained kids. They can cut out hearts all day.

N0 Sew Valentine Heart Garland

When you have your hearts cut out, punch two little holes on the sides. The hole needs to be just big enough to slide the ribbon through. If you wanted to make this a more permanant decoration, I'd recommend putting eyelets in those holes.

No Sew Valentine Heart Garland
String the ribbon through the holes and leave a couple of inches between each heart. All that's left is to find a place to hang it up!

No Sew Valentine Heart Garland

Inspired to make your own heart garland? Share your creation with us here!

Labels: , , , ,

Related Posts Widget for Blogs by LinkWithin
Bookmark and Share

Thursday, January 15, 2009

Learn. How to Make an Envelope

Homemade Envelope Tutorial

Making your own envelopes can be a great way to add just a little something extra to cards, invitiations, or even just a handwritten letter. I can assure you that they are easier to make than you might think.

Homemade Envelope Tutorial

Gather up your supplies. You'll need:
paper
pencil
scissors
bone folder
envelope template
glue
remoistenable glue (optional)

Homemade Envelope Tutorial

I have plastic templates of some envelope sizes. Plastic templates are nice...but not necessary. You can take apart an old envelope to use or there are also several templates online that you can print out. The first thing you'll want to do is trace around your template. Mine has slots where the folds should be. I use my bone folder to score inside those slots to make my folds and then I cut it out along the traced lines.

Homemade Envelope Tutorial

Fold up your envelope. This time I decided to use the patterned paper on the outside. It would look cute with the patterned paper on the inside, as well. When you fold your envelop, make sure that the bottom flap goes on top of the sides.

On the sides of the bottom that touch the side flaps, place some glue and adhere it to the side flaps. That is the only place you want the bottom to adhere or you'll have a hard time getting your card to fit in there!

Homemade Envelope Tutorial

This next step is totally optional but it is one of my favorite things about making my own envelopes. Remoistenable Envelope Glue can be found at craft stores or online. Apply the glue to the top flap and then let it dry. Once it is dry, you can lick it or moisten it like you would any store bought envelope.

Share your homemade envelopes at the flickr group.

Labels: , , , ,

Related Posts Widget for Blogs by LinkWithin
Bookmark and Share

Wednesday, January 14, 2009

Q & A. Envelope and Paper Suppliers


Today's question comes from Kaitlyn of Bright Life in Nebraska. She asked me this question via Facebook and I thought it would make a great Q & A topic.

Q: I wanted to ask you where you buy envelopes from? I usually get my stuff from PaperSource but the envelopes are $5.50 for 10. Any place cheap you know of? Or just paper material for that matter. I love PaperSources colors but not so much the prices.

A: The quick answer is, I get my envelopes from Office Depot. For just plain white invitation size envelopes, you can't beat it. You get a pack of 100 for $7.39. I usually wait for a sale or when I have a good coupon (like $10 off a $30 purchase), I stock up. If I want to fancy them up a bit, I cut a piece of decorative paper to line the inside of the flap or stamp on the outside to match the card.

For special sized cards, I make my own envelopes. This is not very difficult and is a quick project. I'll post a tutorial for that tomorrow.

There are a lot of great resources online for envelopes of all sizes.

Paper Presentation offers envelopes, folders, labels, paper, etc...

Jam Paper offers a lot of great office supplies as well.


For paper, I stick with Stampin' UP. Sure, I happen to know how to get it for a good deal (see the link above) but besides that I really love it. The colors are great, it is high quality, and the colors coordinate with all of their other products (including designer paper and stamp pads). Pictured are the Carousel Notes. They are big scallop cards with coordinating envelopes.
The Paper Mill Store has a large variety of paper and matching envelopes. They have cardstock in a variety of sizes (including 12 X 12) and a decent color selection.
I'm sure some of my readers wouldn't mind sharing their favorite paper and/or envelope resource. Where do you buy your favorite?

Labels: , , , , ,

Related Posts Widget for Blogs by LinkWithin
Bookmark and Share