Wednesday, December 31, 2008

Make. Spice Rub Recipe.

Spice Rub Tins

This project is so easy, I had my husband make them. Things were getting a little hectic before Christmas and I really needed help finishing up some gifts. This was the perfect thing for him to work on.

The recipes listed below made enough rub mix to fill up 6 tins each. We filled the Beef Rib Rub and the Pork Rub tins a little more because the recipe made a little more than the Steak Seasoning.

Spice Rub Tins

Pork Rub Recipe

  • 1/4 cup black pepper
  • 1/4 cup paprika
  • 3 tablespoons sugar
  • 2 tablespoons salt
  • 2 teaspoons dry mustard
  • 2 teaspoons chili powder

Beef Rib Rub Recipe

  • 1/4 cup paprika
  • 1/4 cup mild or medium chili powder
  • 1/4 cup brown sugar
  • 1/4 cup ground black pepper
  • 1 tablespoon garlic powder
  • 1 tablespoon salt

Steak Seasoning

  • 4 tablespoons salt
  • 2 tablespoons paprika
  • 1 tablespoon black pepper, coarsely ground
  • 1 1/2 teaspoons onion powder
  • 1 1/2 teaspoons garlic powder
  • 1 1/2 teaspoons chili powder
  • 1/2 teaspoon coriander
  • 1/2 teaspoon turmeric

The favor tins are available at almost any craft store or Wal-mart. They are also available online here. We used 6 tins for each recipe. I was going to make my own printables for the top and some nice paper along the sides but time just wasn't on my side. Now that they are done simply (using the printable stickers that come with the tins), I'm glad they ended up like that. The recipients of these gifts could care less about having decorated spice tins.

Spice Rub Tins

One thing we added was a magnet on the back (the tape was so I could transport them and not worry about spilling). This allows for easy storage in a number of areas. Alton Brown, my hero, stores his spices on magnetic strips on the inside of his cupboard cabinets.

If you make this project, I'd love to see how it turns out. Please share it at my flickr group.

Labels: , , ,

Related Posts Widget for Blogs by LinkWithin
Bookmark and Share

Monday, December 29, 2008

Make. Simplicity Pattern 8331 Purse

Simplicity Pattern 8331 Bag D

Completing this purse marked a new point in my sewing career. I finished my first (usable) project using a Simplicity pattern. I have several patterns and found them to be confusing. My brain just doesn't quite work that way. To their credit, I used to have this same problem with knitting patterns but have since gathered enough experience that I now understand the basic construction of most knitted garments. I think I'm starting to be a little more experienced with sewing and can now follow basic instructions.

Simplicity Pattern 8331 Bag D

This purse is now in the hands of my sister. She asked me for a purse for Christmas and who am I to disappoint? I followed the pattern exactly until the end. The pattern calls for stitching down the sides of the bag to make it more of a square shape. I liked it too much the way it was so I skipped that part.


Simplicity Pattern 8331 Bag D

My favorite part of the whole bag is the lining. It has a 2 inch panel of the main fabric before switching to the lining fabric. The pocket is also just the right size for my sister's camera. Bonus.

I will definitely use this pattern again. I miss this purse already and would love to make one for myself. The only thing I might change is the flap. The flap attaches to the inside of the bag instead of the outside. I think I might prefer it if it attached to the outside of the bag. I might add another pocket on the other side, too.

Next time you're at your local fabric store and patterns are on sale for $.99, you won't regret picking up Simplicity Pattern 8331 (I made bag D).

Labels: ,

Related Posts Widget for Blogs by LinkWithin
Bookmark and Share

Friday, December 26, 2008

Christy's Craft Challenge Available Spot

Gigi, Mary, Kelly, or my mom...

There is one spot left in my craft challenge.

The first one to "buy" the last spot in my shop can have it.

Labels:

Related Posts Widget for Blogs by LinkWithin
Bookmark and Share

Learn. How to Make a Coloring Book and Crayon Tote

Coloring Book and Crayon Tote Bag Tutorial

This is one of the gifts I made for my kids for Christmas. It is a lined tote bag just big enough for a coloring book and it has the crayon holder on the outside. I didn't use a pattern, although a tote bag is pretty straight forward. HOWEVER...just a few months ago I remember struggling with the construction of a simple tote bag so I shouldn't say that it is straight forward. I should say that, after making one successful tote bag, it gets easier and easier.

Here is my tutorial for the tote bag that I made.

Gather your supplies.

Coordinating fabric (I had a yard of each fabric and that was enough to make 2+ bags)
thread

Coloring Book and Crayon Tote Bag Tutorial
Main fabric: Two 10" X 12" panels (or size that will comfortably fit your coloring book)
Lining fabric: Two 10" X 12" panels, one 4" X 11" (for crayon holder), two 4" X 20" for handles


Coloring Book and Crayon Tote Bag Tutorial

I worked on the crayon pouch first. I folded around 1/4" and ironed it down. I folded the top over twice so I wouldn't have a raw seam edge where I would put the crayons in. I then pinned the pouch about 3 1/2" up from the bottom of the main fabric. Then I stitched three sides, leaving the top alone.

Coloring Book and Crayon Tote Bag Tutorial

I marked the middle of my 4" X 11" fabric (now smaller because of the hemming) and then worked my way out to the sides marking every 3/4". This size fits regular size crayons perfectly. I had jumbo crayons and they fit those as well, just a little snugly. If I did it over, I would mark every 1" for the jumbo crayons.


Coloring Book and Crayon Tote Bag Tutorial

Starting at the bottom of the crayon pouch, stitch a straight line following the marks you made earlier. Stitch all the way to the top and be sure to reinforce your stitches at the top. Trim all your loose threads.

I don't have a picture for this part, but you'll want to sew up main fabric. Place right sides together and stitch the sides and the bottoms. All of the seams I made were 1/4". You'll want to do the same thing for your lining fabric but make sure to leave a 2" gap in the bottom. You'll need that hole later.

Coloring Book and Crayon Tote Bag Tutorial

Next, you'll make your handles. Fold down 1/2 inch on each side lengthwise and iron. Then, fold that piece in half and iron. It will look like the picture above. Stitch along all the edges.

Coloring Book and Crayon Tote Bag Tutorial
Take your finished handles and pin them to your tote bag where you'd like them. Be careful not to twist your handles. Do this on both sides.


Coloring Book and Crayon Tote Bag Tutorial

With right sides together, pin your lining to your tote bag. Make sure you keep those handles inside. Matching side seams, you'll want to stitch all along the top of the bag. Trim the seam (and your handles).

Coloring Book and Crayon Tote Bag Tutorial

Now is the part where that hole in the bottom of the lining becomes necessary. Carefully pull your bag right side out through the opening.

Coloring Book and Crayon Tote Bag Tutorial

It will look like this. Give it a quick iron and then stitch up the hole you left on the bottom of the lining. Put the lining inside the bag and iron the seam along the top. You can topstitch it if you like. I was so tired that I just left it. I don't think my kids will care.

Now it is ready for crayons and your favorite coloring book!

If you decide to make one of these tote bags, I'd love to see it! Share your creation at my flickr group.

Labels: , , ,

Related Posts Widget for Blogs by LinkWithin
Bookmark and Share

Monday, December 22, 2008

Q & A. How Should I Wrap Up Handmade Cards?

This will hopefully be the first of many Q & A sessions here on christynelson.net. The very first question is brought to us by Kristi of the Perkins Clan.

Q: I made some cards for my mom for Christmas, and I'm trying to figure out how to package them. Any suggestion, craft queen?
Thanks!
Kristi

A: What a great question! There are so many great options out there and it can be a little overwhelming. We're talking about standard 4 1/4" X 5 1/2" cards (A2) right now so my suggestions will fit that particular size. However, many of these options can be sized up or down to fit whatever size cards you prefer to make.


1. Card Box. This box was made using the tutorial from Splitcoast Stampers. The tutorial also includes ways that this box can be scaled down for cards of other sizes. This sort of wrapping is also a great idea because you can have the box match the cards and be a part of the actual gift. It is always nice to have something pretty to hold cards.

2. Tote Box. This cute little paper tote is perfect for holding a set of handstamped cards. There is a video tutorial at the Chic N' Scratch Stampin' Academy.

3. Other box templates. This webpage has a list of packaging templates to fill a wide variety of box needs.

saffron thank you set

4. Ribbon. Never underestimate the power of ribbon. Simplicity at its finest. This is how I "wrap" most of my card sets. The reason? I have lots of ribbon and I'm lazy. Actually, by the time I finish making the cards, the last thing I want to do is make something to put them in. I realize that this option isn't always the best choice.


5. Card File Box. Probably not the most attractive option but for sheer functionality, this is a great option. I use one of these in my office to organize all the cards I forget to send out. They come with dividers so you could even label the dividers for the card topics: birthday, thank you, congratulations, get well, etc... I'm sure if you had time, or wanted to, you could fancy up the container a bit.

Do you have a crafty question you'd like me to answer in a blog post? Email me:

christy AT christynelson DOT net

Labels: , , , ,

Related Posts Widget for Blogs by LinkWithin
Bookmark and Share

Tuesday, December 16, 2008

Make. Almond Roca

I'm trying really hard to have a handmade holiday this year. I decided to go with edibles for teacher/bus driver/neighbors this year. Almond Roca was my candy of choice.

Almond Roca Treat Box


Almond Roca Recipe

1 lb. butter
2 cups sugar
2 tbsp. corn syrup
6 tbsp. water
1 cup almonds (chopped finely)
1 bag milk chocolate chips

Using a large pot, melt butter. Add in sugar, corn syrup and water. Stir continuously for approximately 10-15 minutes. In this time the mixture will start to bubble and expand. This is why you want a large pot. When the mixture is at 290 degrees F (or is a caramel brown color and starting to thicken), take off the burner and mix in 1/2 cup of the almonds. Pour into a cookie sheet (lined with wax paper is best) and allow to cool for a few minutes. In the meantime, melt bag of chocolate chips. Pour melted chocolate on top of the butter/sugar mixture and sprinkle with remaining almonds. Allow to cool in refrigerator for an hour before attempting to break into small pieces.

Almond Roca Treat Box

I don't have a picture of any of the Almond Roca outside of the boxes. I thought it best to package it right away to keep me from wanting to eat it all! We did "test" it and it definitely has my seal of approval.

I compromised on the packaging. I could have made the boxes but I didn't. I know my limits. The boxes were purchased at Hobby Lobby (50% off this week, by the way). They are a piece of cake to assemble (just pop them open) and saved me a lot of time and money. I did punch out a scallop tag to place on the top. That's why this project gets the "semi-homemade" seal of approval.

Labels: , ,

Related Posts Widget for Blogs by LinkWithin
Bookmark and Share

Saturday, December 13, 2008

Make. Pencil and Candy Cane Wrappers

I made some gifts for the students in my son's kindergarten class, Sunday school, etc... I wanted to make something but I didn't want to spend hours on a project like this.

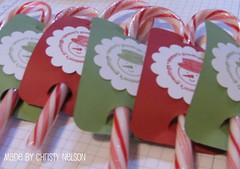
I bought $0.88 candy canes (12 in a pack) and $1 holiday pencils (12 pack). I didn't want to just send the candy or pencils so I made a little wrapper that the item could slip through.


candy cane wrappers

These were quick and simple to make and I think the kids will appreciate them. I chose a non-religious sentiment for the stamp (Season's Greetings) so it would be suitable to send to school. The stamp came from Stampin' UP's Deer Friends set (available to hostesses only).

pencil wrappers

I made enough wrappers that I can send some to my daughter's preschool class as well.

The tutorial for these wrappers can be found in the Learn section.

Labels: , , ,

Related Posts Widget for Blogs by LinkWithin
Bookmark and Share

Learn. How to Make Pencil and/or Candy Cane Wrappers

This project is a quick and simple way to make some wrappers for pencils, candy canes, lollipops, or whatever else you can think to slide through the slits.

Gather your supplies.
Learn how to make pencil or candy cane wrappers

I took this picture before I started making these so there are a few items pictured that I didn't use and a few items that I had to add later.

Here is the list:
paper trimmer
corner rounder
slit punch
scallop punch
paper
adhesive
stamp
ink
pencil or candy cane


Learn how to make pencil or candy cane wrappers
Using your paper trimmer, cut the paper for the wrapper to 2 inches X 3 1/2 inches. You can get 12 wrappers from one sheet of 8 1/2 X 11 paper. Place the paper horizontally into your trimmer and cut 3 1/2 inch strips. Turn those to trim your 2 inch strips. You will have very little waste if you trim the paper this way.

Learn how to make pencil or candy cane wrappers

Using your corner rounder, trim off each edge. I thought I wouldn't do this because it takes a lot of extra time--especially if you are making a large amount of wrappers. In the end, they look so much better with the edges rounded. So, I took the time to do it.

Learn how to make pencil or candy cane wrappers

I stamp multiple images on a sheet and then punch them out all at once. This will save you some time if you are making a large number of these.

Learn how to make pencil or candy cane wrappers

I chose a round stamp that would fit perfectly in a scallop punch. I had intended to have this be an extra layer on a different color scallop but since I spent the time to trim the corners, I eliminated this step. There are a number of ways you can embellish your wrapper!


Learn how to make pencil or candy cane wrappers

This is a slit punch. There are a lot of great uses for this kind of punch but this has to be one of my favorites. I turn my punch upside down so I can see exactly where it will be punching the paper.

Learn how to make pencil or candy cane wrappers

You'll want to punch a slit on both narrow sides of your wrapper. You can eyeball it but I had it a little less than 1/2 inch from the bottom and top.

Learn how to make pencil or candy cane wrappers

Remember that you won't actually be removing any paper with this punch. Don't try to pull it off. All you will be doing is making a slit.

Now all you have left to do is attach your stamped scallop and put a pencil or candy cane through the holes made by the slit punch.

pencil wrapper

This project doesn't need to be limited to just the holidays. Can you image birthday party favors? Halloween candy wrappers? The simple techniques used to make this can be applied to a variety of projects.

Try out this easy project and then share your wrappers with me in my Flickr group.

All products and images used for this project are available from and copyrighted by Stampin' UP.

Labels: ,

Related Posts Widget for Blogs by LinkWithin
Bookmark and Share

Thursday, December 11, 2008

January Craft Challenge Full

christy-craftchallenge150px

Looks like you all are as crazy as I am and can't pass up a good craft challenge. I can't tell you how excited I am about this new venture and I'm really looking forward to seeing what kinds of things we can create in the new year.

If you didn't get in on the fun this month, don't worry! I'll have signups for February and even options to join several months at a time. I seriously didn't expect all of the slots this month to go so quickly. Your crafty enthusiasm amazes me!

I've opened my christynelson.net shop on etsy and have 10 spots listed for the challenge. I had to list them for $.20 but for this inaugural (thanks, spell check) month you don't need to pay anything to participate.

If you are on the list for January, please "purchase" this item from etsy. This is how I will keep track of all the participants and have your addresses in a single location. I will also have all future craft challenge month spaces for sale in this space in the future. When you purchase this item, you can choose "other" as the payment method and just ignore all requests to pay. I will indeed mail the package to you so it will arrive sometime the first week of January.

The list:

1. Momma to 1 Looking for #2
2. Perkins Clan
3. Maren
4. Chimera Crochet
5. Arbee
6. Pigbook1
7. Brenda
8. Deb
9. The Holdaways
10. Anne
11. Jill

Alternates: Gigi, Mary, Kelly, my mom

If I can get enough supplies for the alternates, I'll go ahead and send those as well. If not all the packages are purchased before Dec 26th, I'll open it up to the alternates to get the remaining slots.

I'm also looking for sponsors to donate craft supplies or prizes for the winners. Any interested may contact me via email at christy AT christynelson DOT net.


Labels:

Related Posts Widget for Blogs by LinkWithin
Bookmark and Share

Wednesday, December 10, 2008

Christy's Craft Challenge

christy-craftchallenge240px

Calling all participants to Christy's Craft Challenge! I'm taking sign ups now for the January edition of the craft challenge. If you'd like to participate, please leave a comment on this post and a way for me to contact you. You may also contact me at:

christy AT christynelson DOT net

The first ten people to respond will receive a manila envelope in the mail full of craft supplies. Each person will then craft something of their own design using the supplies received. Post a picture to my flickr group and at the end of the month we will vote for a winner. The winner will receive all the glory they deserve and will get the next month's challenge kit for free (all participants in the first month will receive their kit for free but each subsequent month there will be a small fee to cover shipping) and a prize.

Are you in?

Don't forget to join my Flickr Group and subscribe to this site for the latest updates.

Labels:

Related Posts Widget for Blogs by LinkWithin
Bookmark and Share

Learn. Dry Embossing Tutorial

Dry embossing is a technique that can really add a lot to a project. The result of dry embossing is a raised pattern on your paper.

Gather the following supplies:
Learn Dry Embossing Tutorial

Light box
stylus
brass stencil
paper
coordinating rubber stamp (optional)
stamp pad (optional)

Learn Dry Embossing Tutorial

This particular project I'm featuring is a stamped and embossed bookmark. I have some pre-cut bookmarks and stamped my flower image on the paper.

Learn Dry Embossing Tutorial
The next step will be to get your light box ready. A light box is relatively inexpensive. It is even better if you can use your craft store coupons to get it at a discount. This small one is available from Amazon.

Learn Dry Embossing Tutorial

At this point you'll want to turn your stamped image over. Whether you are embossing over a stamped image or not, you'll want to be sure that you have the wrong side up. The template should be placed between the paper and your light source. You can purchase brass templates at a craft store. I use the templates from Stampin' UP! because they offer a lot of different options and they match the stamp sets perfectly. The template in this tutorial is no longer available but Floral Frenzy is a good substitute.

Learn Dry Embossing Tutorial

You will need a stylus to trace around your image. These can be found at any craft store and are inexpensive. This one is available from Stampin' Up for $2.50. Press lightly on the paper and trace around the inner edge of the template. You'll be able to see and feel how the paper is being raised to the other side.


Learn Dry Embossing Tutorial

It is a little difficult to see embossing in a picture, but I've tried to capture here how the image is raised off the page. I also embossed the little dots in the center of the flower.

There are so many different ways to incorporate embossing into your paper crafts. My quick example is this simple bookmark, embellished with a little yarn at the top.

Learn Dry Embossing Tutorial finished product

Tuck this into a book or include it with a gift card and you have a fabulous gift for someone special.

Try out this easy technique and then share your dry embossing projects with me in my Flickr group.

Labels: , , ,

Related Posts Widget for Blogs by LinkWithin
Bookmark and Share

Tuesday, December 09, 2008

Make. Camera Strap Slipcover


Camera strap slipcover

An hour before I was supposed to be at a holiday party, I decided that I had to have a slipcover for my camera strap. It was one of those compulsions that I could not deny. Luckily, I had bookmarked a tutorial for a clever strap slipcover so I didn't have to worry about figuring out how to do it on my own. You can find the camera strap slipcover tutorial that I used at Made by Petchy.

This slip cover took about 10 minutes to make, tops. It took me almost that long to put the camera strap back on the camera. That was really the most difficult part of this whole project.

This is one of those great projects that, with the right fabric choice, could work for anyone with a camera. I used an Amy Butler fabric for mine. It is a great print and uses my favorite color--green!

If you decide to take the 10 minutes out of your day to make this project, please share it with me!

Labels: , ,

Related Posts Widget for Blogs by LinkWithin
Bookmark and Share

Saturday, December 06, 2008

About Me

For most of my life I've been consumed with crafting. I started out with friendship pins and bracelets in my childhood and I now love working with fiber, paper, fabric, and glitter. I began blogging in 2004 and will continue to use The Crafty Conservative as my personal blog. This site is designed to encompass all things "Christy Nelson" and share my love of handmade items.

I'm the wife of a college professor. I have a degree in Communications and am a former high school Spanish teacher. We are the parents of two children. They were both adopted at birth. The oldest has autism. We've lived in a few different states (California, Oklahoma, Indiana) but now we call Nebraska our home and love it!

Follow Me on Twitter:
@sra_nelson

Join My Flickr GroupShare with ChristyNelson.net

More Christy Nelson online:

Print Toolulu is a business I started with my friend Deb.  We're working hard to help small business owners navigate social media.


I am one of the staff bloggers at Family Eden.  I blog once a week about crafting with kids and family management.

Labels:

Related Posts Widget for Blogs by LinkWithin
Bookmark and Share