Tuesday, June 30, 2009

Make. A Reversible Sun Hat


I don't wear hats.  However, I have this fascination with this pattern and I don't think I'll be able to resist much longer. 

Maybe I'll make a smaller one for my kids.

Do you ever make things that you know you might never use? 

More importantly, what fabric should I use? 


photo from Craft Stylish

Labels: , , ,

Related Posts Widget for Blogs by LinkWithin
Bookmark and Share

Monday, June 29, 2009

Make. Refashioned Curtains

I spent last week at my mom's house.  She bought a brand new Baby Lock sewing machine and was anxious to use it.  Her first project were curtains. 

IMG_2139She had a bed skirt from her bedroom set that she wasn't using and she loved the colors.  So, she cut it up!  IMG_2138

She cut off the fabric sides and added interfacing to the back to make them a little stiffer.   

In this photo you see how she ironed on the interfacing. 

She folded over the top and sewed it shut to make a casing for the curtain rod.

The biggest part of her project was making her side panels.  These weren't difficult, just a little bulky to work with. 

1st grace project002I think they turned out great!   I'm sure that new sewing machine is going to see a lot of use.

Have you ever used a bed skirt for any other purpose?

Labels: , , , , ,

Related Posts Widget for Blogs by LinkWithin
Bookmark and Share

Sunday, June 28, 2009

Guest Blogger Application

Labels:

Related Posts Widget for Blogs by LinkWithin
Bookmark and Share

Saturday, June 27, 2009

June Craft Challenge Winners

flower gift tag june The winner is Rhonda!  She will win a prize package from Laundry Tree and a free month of the craft challenge (August).  Rhonda is running a similar craft challenge to mine- I think sign ups are over, though- where she took items destined for the trash so you can turn them into treasures!  I'll certainly keep my eye out on that one!  Should be fun to see what people create from that.

Everyone that completed their item this month blogged about it!  I drew a name out of a hat and the winner of the free month of the craft challenge (August) is:  Robin from rsisland crafts.

Congrats to both of you!  August packets are available now so go and pick one up at my etsy shop!

Labels: , , ,

Related Posts Widget for Blogs by LinkWithin
Bookmark and Share

Thursday, June 25, 2009

June Craft Challenge Voting

It's time to vote! Here are the finalists for June. The winner will receive a great prize package from Laundry Tree including TWO starter kits! I use Laundry Tree soap nuts on my laundry and they are great. They are gentle enough to use on my handknits and I think they are the reason my daughter's back and belly aren't all red and scratchy anymore. If you don't win, they are worth taking a look at! You use 3-5 "nuts" at a time and those last for about 5 loads. I absolutely love them!

Just a reminder: the craft challenge is taking the month of July off. I'll be at the Craft & Hobby Trade Show in Orlando and will be busy, busy, busy finding all the most awesome craft supplies for YOU! If you'd like to sign up for August, those are available in my etsy shop.

Voting will close on Friday night before I go to bed and I'll announce the winner on Saturday. Good luck!

Labels: ,

Related Posts Widget for Blogs by LinkWithin
Bookmark and Share

Tuesday, June 23, 2009

June Craft Challenge Reminder

IMG_2070 We've got until tomorrow night to get in your craft challenge entries.  I'm busy working on mine as I write this!  And by busy, I mean *thinking* about working on it.  I'm on a little vacation this week and I brought the supplies with me. 

Our sponsor is Laundry Tree.  Trust me, you want to win this!  Get crafting!

Want to participate in August?  Packets are available now at my etsy shop.

Labels: , ,

Related Posts Widget for Blogs by LinkWithin
Bookmark and Share

Monday, June 22, 2009

Learn. How to Make a Drawstring Bag.

IMG_2126

I'm using up all the leftover fabric from the dresses to make drawstring pouches for all the girl cousins.   This is just a simple bag pattern but I use a buttonhole for the drawstring opening.   This is totally customizable.  In fact, I haven't measured for a single one.  I've just been cutting out what I can from the scraps.  This would actually be a great project to use up some fat quarters and it takes all of about 15 minutes to make. 

IMG_2117Here are the step by step instructions.

Supplies:  two coordinating fabrics (approximately two fat quarters)

Ribbon or cord for the drawstring


Cut out four pieces of fabric.  The ones shown here are approximately 6" x 9" each.  You'll want two of each type of fabric.  Two of the pieces will be for the outside and the other will be for the lining. 

IMG_2118Place right sides together of matching fabrics.  Sew along three sides of the outside fabric (leaving the side you want to be the top unsewn).  Do the same for the lining but leave an opening about 2 inches wide on the bottom.   On this picture you can see I left he opening and then I used the pinking shears to trim around the seams.  This is optional.  IMG_2120You could also just press the seams open (or not--it is just a little easier to sew it together later if you do a little ironing).

Using the buttonhole feature on your sewing machine, place a buttonhole approximate 1 1/4" from the top of the outer fabric. 

Now you will place your outer piece inside the lining.  Make sure the right sides of the fabric are together.   See image below.IMG_2121

Sew around the top of the bag.  I use a 1/4" seam allowance. 

Once the bag is sewn all the way around, you will want to pull the bag through the hole you left in the bottom of the lining. 

Fold the lining inside the bag and press along the top.  You are now ready to top stitch and make the casing for the ribbon.IMG_2123

As you can see in this picture, I stitched 1/4" above and below the buttonhole.   You will stitch all the way around the bag. 

Now all that is left is the drawstring.  Cut a length of ribbon.  Make sure it is long enough to tie. 


IMG_2124

Use a safety pin to help guide the ribbon through the casing.  Once it is all the way around and through the other side, trim your ribbon to the size you like and tie a knot at the end. 

Your little girl will love to put all of her treasures in this simple pouch! 


IMG_2125

Labels: , , , , , , , , ,

Related Posts Widget for Blogs by LinkWithin
Bookmark and Share

Sunday, June 21, 2009

Make. Drunken Argyle. Mission Completed!

IMG_2134

I finished it!  Just in time for Father's Day.  I was weaving in the last of the ends last night.  It could use a wash and another good blocking but I made my husband wear it to church anyway.  From start to finish this sweater vest took me close to 2 1/2 years.  Now that it is finished, I'm starting to feel a little sad and wonder what my next long-term project will be.  IMG_2137

Labels: , ,

Related Posts Widget for Blogs by LinkWithin
Bookmark and Share

Friday, June 19, 2009

Winner. Greeting Card Fashion Plates

IMG_2104

Here are your random numbers:

5

Timestamp: 2009-06-19 13:20:28 UTC


punkinmama said...


I'm a fan... I'd be your BIGGEST fan if I won these fashion plates. It's one of the few things I remember from my childhood! Loved these!


Congrats!  Email (christy@christynelson.net) or DM me (@sra_nelson) your address and I'll get those sent out tomorrow!

Labels: , ,

Related Posts Widget for Blogs by LinkWithin
Bookmark and Share

Thursday, June 18, 2009

BlogHer Wardrobe Winners

Thanks for all of your votes.  I really was having a hard time deciding.  Here are the top 3 choices from your votes.  I'll be rocking these fabulous clothes from IGIGI at BlogHer in Chicago! 

claudia 

kylie

starla

Now I just need some jewelry and shoes. 

Labels: , ,

Related Posts Widget for Blogs by LinkWithin
Bookmark and Share

Wednesday, June 17, 2009

Stuff I Like. Dresses from Refibered

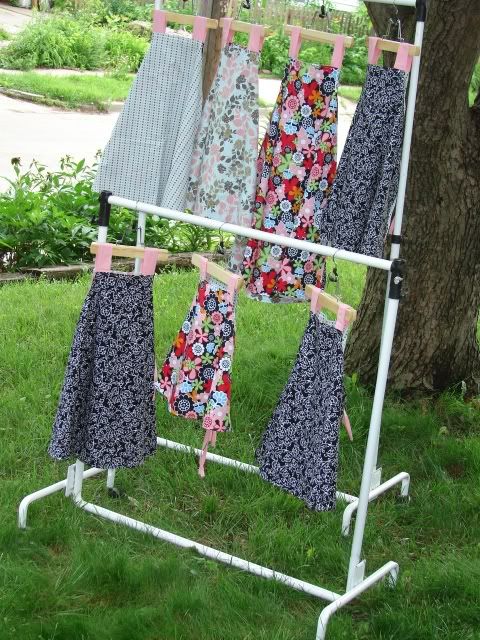
My mom special ordered some dresses from Kelly at Refibered for all of her granddaughters.  I got to pick out the fabric. 

You can read more about the dresses and see more pictures at Kelly's blog.   I got to pick out four different fabrics.  The dresses are totally reversible and either side can be worn in front.  A four in one, if you will.  On the top left you can see the two light blue fabrics.  One has polka dots and the other is a floral print.  The flip side of those are the bright floral and black/white.  Pink straps tie the whole thing together. 

She did such a great job on these dresses and I can't wait to see all of the girls wearing them.  There is enough fabric left over for me to make some little drawstring bags for each girl.  I'll post pictures of those as soon as they are made. 

*Don't forget to enter the Greeting Card Fashion Plates giveaway!*

Labels: , , , ,

Related Posts Widget for Blogs by LinkWithin
Bookmark and Share

Tuesday, June 16, 2009

Make. Fashion Plates and Greeting Cards (giveaway!)

I went to some garage sales last weekend and found the most amazing things!  My favorite (by far) has to be the Fashion Plates.  My daughter and I have been loving playing with them.  IMG_2100 The set is perfect!  All the clothes I remember from my childhood.  It even had all of the colored pencils!  I wonder if this person even really played with it when she was little?  IMG_2101

We have tons of these little pictures all throughout the house now.  They are so much fun! 

On the back of the plates there are textures.  You can use those to color in patterns on your clothes.  I kept mine pretty simple this time around.

Something came with these fashion plates that I hadn't seen before.  It's a fashion plate greeting card maker!  IMG_2103 It has two different sized plates that you can use to make a small greeting.  There are pictures and sayings included.  It's so old that the images are starting to be back in style!IMG_2102

Included in my $2 purchase were TWO of these kits!  I'm keeping one for myself but would love to pass the other one on to one of my readers! 

Are you interested? 

Last week I introduced you to my new facebook fan page.  Become a fan and then comment here on this post if you would like to win.  I'll pick a winner on Friday, June 19th.    Good luck!

IMG_2105

Labels: , , , ,

Related Posts Widget for Blogs by LinkWithin
Bookmark and Share

Sunday, June 14, 2009

Choose My Wardrobe

I am attending a few high profile events this summer including BlogHer, the Craft & Hobby Trade Show, and a Ford Ride & Drive Event for bloggers. Finding cute plus size clothes is always a struggle so I decided to look online and see what I could find. As soon as I saw the IGIGI website, I fell in love! Modest clothes for sizes 12-32. I contact their media department to see if they would be willing to sponsor my wardrobe for these events and they said yes! Not only that, but I'll have a $100 gift certificate to give away to one of my readers at the end of July.

I get to choose 3 pieces and I decided to let all you you help me pick. If you need a reminder of what my curves look like, you might want to check out my duct tape dress form post. Please keep those babies in mind when choosing my outfits! You can vote more than once but you can only vote for one item at a time. I'll also allow write-in votes. If you find something on the IGIGI website that you like better than the items I've picked, let me know in the comments!


*all pictures courtesy of IGIGI.com

Labels: , , , , ,

Related Posts Widget for Blogs by LinkWithin
Bookmark and Share

Saturday, June 13, 2009

Stuff I Like. Pounce on Etsy

This week I'm doing something a little different with Stuff I Like. I decided to feature items from etsy sellers that have yet to make a sale. Sometimes it is hard to get your shop and products noticed. I found all of these items using the Pounce feature at etsy. Find something you like and I'm sure you'll make this seller's day by being their very first etsy sale!
 
This etsy mini has been replaced with a screen shot.
pouncemini 

Labels: , ,

Related Posts Widget for Blogs by LinkWithin
Bookmark and Share

Friday, June 12, 2009

Sponsor Spotlight. Comfy Creations

Back in May I did a Stuff I Like post on travel related items.  One of the items I featured was a therapeutic combo pack from Comfy Creations.  When I'm traveling I always wish I had something like that so I made sure to put it in my feature. 

I have since been in contact with Kathleen over the past few weeks and she sent me her mid size back relief pack to review on my blog*.  I don't know whether to blame Comfy Creations or not but the day before her product arrived, I got a massive crick in my neck and I couldn't move my head to one side.  How's that for ideal testing conditions?  Because my neck was hurting, the rest of my muscles felt strained as well from taking up the slack. 

Let's just get straight to the pros and cons, shall we?

Pros:

What drew me to these products in the first place were the fabric choices.  When you're in pain, it sure helps to have something extra pretty to rely on. 

They smell great!  I didn't even have to see who the package was from when I got it out of the mailbox.  It is a soothing lavender smell that is not too strong, but just enough.   They are also available unscented or peppermint. 

There are four pockets in the back relief pack.  This helps for even distribution of the heat.  It was nice to not have all of the warmth sink down to the bottom of the pack when I would put it on.

I used this a lot on my belly during a recent not uncommon female condition and it was particularly helpful.

Cons:

I wish it had ribbons attached to it so I could tie it on and wear it while doing stuff around the house.  I realize that this is probably not the point of this therapeutic wrap but I couldn't help but wish for it.

I found myself wanting the eye pillow to be a little longer so it would cover my temples.  As it is, it goes to the far edge of my eyes but when I have a headache I like to have the warmth cover my temples. 

So, there you have it!  Comfy Creations is one of the sponsors** here at ChristyNelson.net so I hope you'll take a moment to go and visit the shop.  You can click on their ad in the sidebar. She carries a wide range of products including keyboard and mouse wrist rests that I could certainly use after a long day of blogging!  Check them out.

*Product provided by sponsor

**Sponsor information available

Labels: , , ,

Related Posts Widget for Blogs by LinkWithin
Bookmark and Share

Thursday, June 11, 2009

Make. Stationery Box

IMG_2086

This is a cute little box full of stationery.  I made it for a wedding gift.  You can find the pdf instructions at this site (we'll forgive her calling it a "stationary" box). 

Had I realized how easy this box was to put together, I would have made one a long time ago. 

IMG_2085Here is the box all closed up.  I used a Simply Scrappin' kit from Stampin' UP called Petal Party.  I chose this paper from my stash because the colors matched the wedding invitations.  All the paper I used came directly from this packet except for a few of the cards that go inside.  Not bad.  I also have enough paper to make at least one more complete box.


IMG_2087 This box has all sorts of little compartments.  In one of them I put a Target gift card and some tags I punched.  In the other I made some 3X3 notecards and included some mini envelopes.  The fold out section of the box features a little address book and a pocket for stamps.  You can also add a little pen holder. 

IMG_2088 Here you can see all I have included inside the box.  I'll be adding a few more full size cards to the mix before Saturday but this was all I had completed this morning as I was ready to take pictures. 

I hope the bride and groom appreciate it.  I might be a bit biased but I think it is a practical (and cute) handmade gift.  What do you think?  Would you have wanted to receive something like this when you got married? 

Labels: , , , , , ,

Related Posts Widget for Blogs by LinkWithin
Bookmark and Share

Wednesday, June 10, 2009

Learn. How to Subscribe to Blogs and Be My Biggest Fan.

I've had several people ask me lately what I mean when I tell them they can subscribe to my blog.  There are a few options and I'm going to show you step by step how to do it.

1. Subscribe via email.  If you don't use a subscription service like Google Reader, this is an excellent option.  All you do is enter your email address over there in my sidebar.  subscribertute 

Underneath the twitter bird is an area for you to enter your email address.  Click subscribe and that is it!  My blog posts will show up in your email inbox once each day that I post. 


2.  Google Reader.  This is one of my favorite web tools.  readertute I manage all of my blog subscriptions this way.  Google Reader shows me when my favorite blogs have updated so I don't have to take the time to go through bookmarks or remember which blogs I want to read. 

In the upper left underneath the logo, you click on add a subscription.  You can type in the blog address and you're set!  You can organize your subscriptions by categories too.  That comes in handy if you've got a long list of blogs you like to keep up with. 

If you click on the "Follow Me" buttons found on a lot of blogs these days, all of those can be managed in Google Reader as well.  subscribe

I use this handy little bookmark tool.  If you click on Settings (top right) when you are in your google reader, you'll see a bunch of options.  Click on "Goodies" and you'll see this one!  Subscribe as you surf!  All you do is drag that bookmarklet up to your tool bar and anytime you're browsing around and see a site you'd like to subscribe to you just click on that and it will automatically add it to your reader!  Fancy, eh?

christy-tag300px3.  Be My Fan!  

Another way to keep on top of the latest blog posts is to be my fan on Facebook.  If you have a facebook profile,  my blog posts will show up in your status updates.  I've also got a few fun things in the works just for my facebook fans (think craft swag!) so become my fan on my brand new page! 

I hope this was helpful and you're all on your way subscribing to some great new blogs.  I'd love to add your blog to my google reader!  Share the link in the comments.

Labels: , , ,

Related Posts Widget for Blogs by LinkWithin
Bookmark and Share

Tuesday, June 09, 2009

Lincoln Handmade Team Prize Package

In May, the Lincoln Handmade etsy team sponsored the craft challenge.  Here is a short video showing off some of the things included in the prize package! 

Search the tag "lnkhandmade" at etsy and you'll find all sorts of great items. 

Would your business like to sponsor a craft challenge prize?  Find out more information at our Sponsor FAQ page

Related Posts Widget for Blogs by LinkWithin
Bookmark and Share

Monday, June 08, 2009

Make. Pleated Purse

IMG_2063

This is the pleated purse pattern from My Spare Time.  True to form, I made a few modifications.  However, the main sections of the bag are straight from the pattern.IMG_2064

Modifications:

I changed the pleats.  I wanted the pleats to all be in the middle.  I just like the way that looks.

I used a contrasting color for the top instead of the same outer fabric. 


IMG_2066

The added a little bit of stitching to the pockets so they would have some compartments.  I stitched right down the middle on one of the them and a little off to one side for the other. 

There is quite a bit of room in this bag considering it doesn't use a lot of fabric. 


For next time:  I am planning on making more of these bags.  There isn't a lot I would change, but one thing I would do is add interfacing to the outer top.  The magnet fastener is a little heavy and I think it would help keep the top of the bag from sagging in.

Labels: , , , , ,

Related Posts Widget for Blogs by LinkWithin
Bookmark and Share

Sunday, June 07, 2009

Make. Drunken Argyle Sweater Vest Still in Progress

I thought it was time for a "state of the sweater vest" posts.  A few weeks ago, I gave an update on how things were coming along.  I also set a goal for myself to have it finished for Father's Day. 

IMG_2077 I'm making progress.  The front is now off the needles.  I'm done with the charts and intarsia.  It is the same size as the back.  Now for the "fun" part.

IMG_2075I have lots and lots of ends to weave in.  I've been working on it last night and for a couple of hours today.  Yep.  Hours.  Slow going.  Lots of ends. 

Once I'm finished with that task, I'll block it.  This just means that I'll get it wet and pin it out to dry in the dimensions that I want it.  It will make my stitches look nicer and be much easier to seam up.

After seaming, I'll have a little bit more knitting to do.  I still have to do the ribbing around the neckline and the armholes.  That should take me too long and I'm starting to think that I really will have this thing done by Father's Day.  Dare I say it?  With plenty of time to spare.  

Labels: , , ,

Related Posts Widget for Blogs by LinkWithin
Bookmark and Share

Friday, June 05, 2009

June Craft Challenge Packet

IMG_2070

I was in such a hurry to put these in their baggies and envelopes that I didn't get a proper picture of the craft challenge items for this month.  You can kind of get an idea here on what will be included.  Let's just say I was a bit inspired by

WEDDINGS!

You're getting a smattering of rose petals, a string of pearls, some white floral ribbon, a die cut favor box, and an empty toilet paper roll. 

Good luck! 

FYI:  The craft challenge will be on "vacation" for July.  If you have purchased a subscription I have automatically added an extra month.  Would you prefer a refund for that month?  Email me to arrange that.  I'm flexible.  I'm just going to be at the CHA trade show at the end of July and I don't want to have to worry about running the challenge so I'm taking that month off.

Labels: , ,

Related Posts Widget for Blogs by LinkWithin
Bookmark and Share

Thursday, June 04, 2009

Make. Free Skirt Pattern: Pick Your Panels

IMG_2072

This pattern was made up out of necessity.  I really wanted to use that green chicken/egg fabric for a skirt but I only had one yard.  It is a directional print so that made it even  more limiting.  I came up with a plan for a panel skirt.  In the end, I found this to be a great way to combine fun fabrics and by choosing a solid dark color for the side panels it made the skirt slimming! 

To make this skirt fit your size and fabric requirements, you'll need to do a little math.  As such, fabric requirements will vary.  I made mine using a total of 1 3/8 yards. 

Measure your waist.  Take that number + 1. 

Divide that number by the number of panels you would like in your skirt.  The brown panels in the photo above are 1/2 panels and count as 1. 

If you have a 35" waist and want 6 panels, you will divide 36 by 6.  This is your waist number. 

The next number you'll need is your flare.  Take your waist number and multiply it by 2.  Our flare number would be 12. 

Now you need to decide how long you want your skirt.  I cut mine out to be 22 inches long but this is personal preference.  I'd rather cut it too long than too short!IMG_2073

You now have your panel measurements.  They will be 6 inches at the top, 12 inches at the bottom, and 22 inches long. 

In this picture you can see the general shape of the panel.


To cut your panel pieces to these measurements, you'll want to cut your strips using the flare number and the length.  In this case, you'll make 6 strips measuring 12 X 22. 

Fold the strips in half lengthwise.  Use your ruler to make a diagonal cut to the 3 inch mark (or HALF of your waist panel number).  When you unfold the panel, it will be 6 X 12 X 22 (or waist panel number X flare number X length). 

Sew your panels, right sides together, along the long edge.  I used a 5/8" seam.  Continue around all of your panels and join them when you reach the last panel.  I used pinking shears to trim all of my seams. 

IMG_2074

For the waistband, fold your skirt in half and measure around the waist.  Multiply that by 2 to get the measurement all the way around.  Cut a 5 inch wide strip to measure the same length as your waist (plus 1 inch).  For the example skirt the measurement would be 5" X 36".  You can also piece this together if you don't have a 36" length of fabric.

Sew the short ends of the waistband, right sides together. 

Iron the fabric in half lengthwise.  Then open it up and fold and iron in 1/4" along each length. 

With the waistband folded in half, pin it to the top of the skirt with right sides together.  Stitch it to the skirt but leave a 1 1/2" opening so you can thread your elastic. 

Cut your elastic 2" less than your waist measurement.  Using a safety pin, thread it through the casing.  Sew the two elastic ends together being careful not to twist it.

Now you can stitch up the opening.  I used 1/2" elastic and wanted it to stay near the top of the waistband so I did a top stitch around the waistband making sure not to catch the elastic. 

All that is left now is the hem!  I did a simple hem on this skirt and just folded up the bottom a couple of times and stitched around.  You could easily add another fabric around the bottom or a ruffle to make the skirt a little more unique.  It's up to you!

I'd love to see your finished product.  Don't forget to share your photos with the flickr group

Here is my skirt (and shirt)  "in action" backstage after the Yanni Voices concert in Omaha. 

3585622328_358f3b5f06

Labels: , , , , , , ,

Related Posts Widget for Blogs by LinkWithin
Bookmark and Share

Wednesday, June 03, 2009

BlogLuxe Award

I've been nominated by someone over at the SocialLuxe Lounge for a BlogLuxe award in the "Blog You've Learned the Most From".  The competition is stiff and I have very little chance of winning.  However, I'd like to make a bit of a showing!  You can vote once a day per email address.  I hope you'll take the time to go and show my website some love!
Vote for ChristyNelson.Net HERE!

Related Posts Widget for Blogs by LinkWithin
Bookmark and Share

Tuesday, June 02, 2009

Learn. How to Refashion a T-shirt.

The skirt pattern will have to wait until tomorrow.  We're having a rainy day and I want to get some better photographs for the pattern.  Instead, I give you this t-shirt tutorial a day early!

IMG_2048 Here is the finished shirt on my duct tape dress form.  I really like the way it turned out and I can see myself making even more of these!  There are so many variations you can do and it was super quick and easy.IMG_2045

I started out with two t-shirts.  The green one was ripped and the white one was stained. 

I cut up the green shirt so it would fit in my die cut machine.  I used the scallop circle die from Stampin' UP.  You don't need to have a die cut machine for this.  It was just super quick for me to run my t-shirt through there and get some uniform shapes.  You can cut out your own shapes using scissors.  I found this tutorial using cut up heart shapes. 

IMG_2046

Here you can see my stained shirt and my stack of scallops.  Get some embroidery floss that matches your embellishments.  You can also use doubled up thread. 

You'll want to do a running stitch through the scallop shapes.  All that means is you want to run your thread and needle up and down across the shape two or three times.  This will gather up the shape and then you'll want to tack it down on the t-shirt. 

Once you have one down, pull the needle and thread through the t-shirt to the front.  You'll want to make sure you pull it up underneath your shape so it is hidden.  Repeat for your next shape. I used six scallop circles for this shirt.  IMG_2047

I have several ripped t-shirts that I have big plans for.  Next time I'm going to use smaller shapes and different colors for a new effect. 

I'd love to see your t-shirt creations!  Share them at my flickr group

Labels: , , , , ,

Related Posts Widget for Blogs by LinkWithin
Bookmark and Share